Week 6 [Sep 17]
Todo
Admin info to read:
Policy on suggested length for submissions
We don't usually give a strict page limit for documents such as User Guide and the Developer Guide. You need to decide yourself how long the document should be based on the purpose and the intended audience. You can determine the level of details required based on the samples we provide.
Why very narrow project scope?
Defining your own unique project is more fun.
But, wider scope → more diverse projects → harder for us to go deep into your project. The collective know-how we (i.e., students and the teaching team) have built up about SE issues related to the project become shallow and stretched too thinly. It also affects fairness of grading.
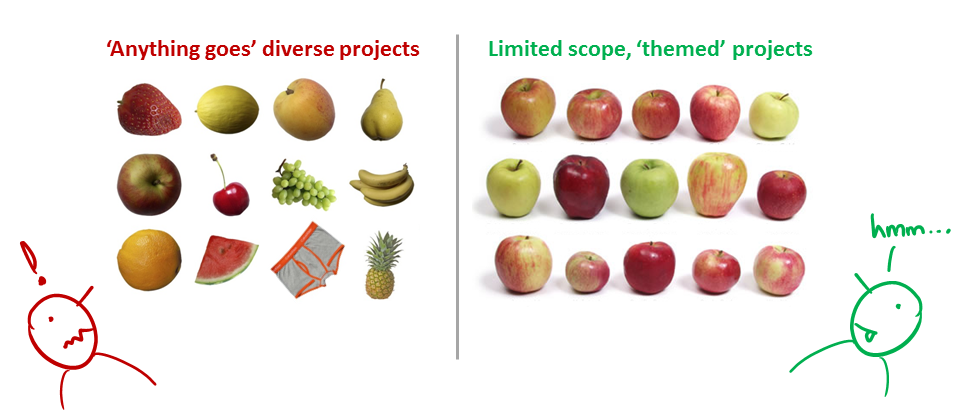
That is why a strictly-defined project is more suitable for a first course in SE that focuses on nuts-and-bolts of SE. After learning those fundamentals, in higher level project modules you can focus more on the creative side of software projects without being dragged down by nuts-and-bolts SE issues (because you already know how to deal with them). However, we would like to allow some room for creativity too. That is why we let you build products that are slight variations of a given theme.
Also note: The freedom to do 'anything' is not a necessary condition for creativity. Do not mistake being different for being creative. In fact, the more constrained you are, the more you need creativity to stand out.
Why project requirements are so vague?
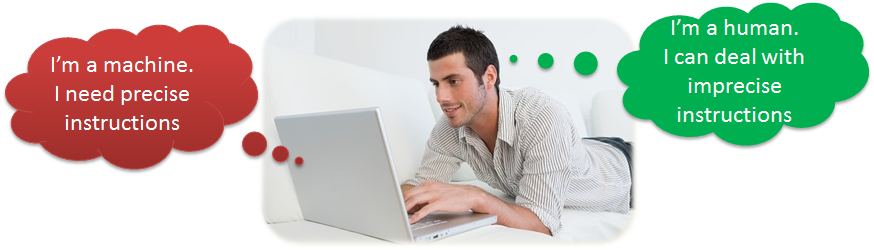
"You tell me exactly what to do - I do that - you pay me (in grades)" is a model for contract work, not for learning. Being able to survive in imprecise, uncertain, volatile problem contexts is precisely what we are trying to teach you.
For example, the best way to communicate something often depends on what is being communicated. That is why we don't specify the precise content for project documents. Instead, we aim to refine project documents iteratively. We believe the learning experience will be richer if we let you decide the best way to present your project information rather than just following our instructions blindly. For example, in real-life projects you are rarely told which diagrams to draw; that is a decision you have to make yourself.
Outcomes
Design
W6.1 Can use intermediate-level class diagrams
W6.1a Can use UML notes
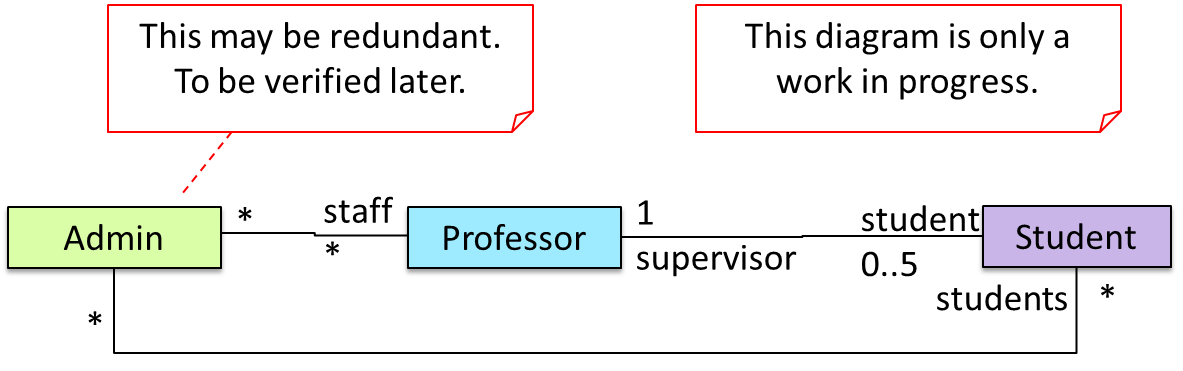
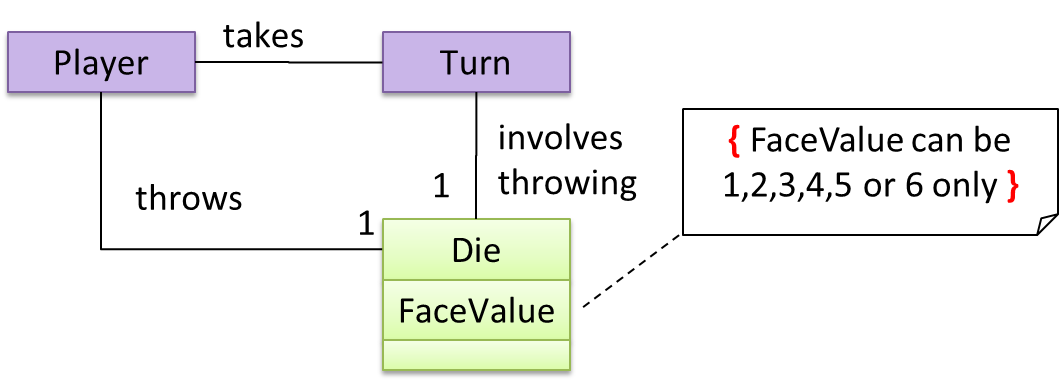
W6.1b Can specify constraints in UML diagrams
W6.1c Can show an association as an attribute
Tools → UML → Class Diagrams →
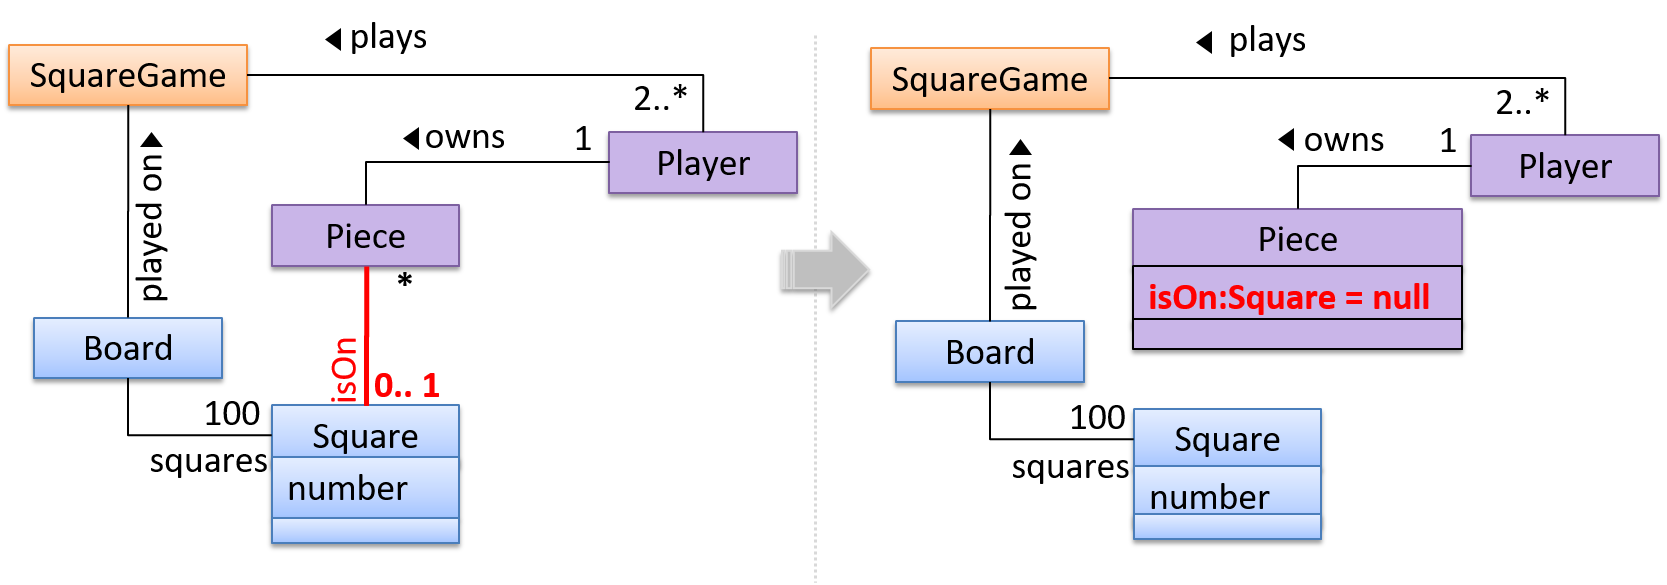
An association can be shown as an attribute instead of a line.
Association multiplicities and the default value too can be shown as part of the attribute using the following notation. Both are optional.
name: type [multiplicity] = default value
The diagram below depicts a multi-player Square Game being played on a board comprising of 100 squares. Each of the squares may be occupied with any number of pieces, each belonging to a certain player.
A Piece may or may not be on a Square. Note how that association can be replaced by an isOn attribute of the Piece class. The isOn attribute can either be null or hold a reference to a Square object, matching the 0..1 multiplicity of the association it replaces. The default value is null.
The association that a Board has 100 Sqaures can be shown in either of these two ways:

W6.1d Can use intermediate-level class diagrams
Design → Modelling → Modelling Structure
A class diagram can also show different types of associations: inheritance, compositions, aggregations, dependencies.
A class diagram can also show different types of class-like entities:
Which of these statements match the class diagram?
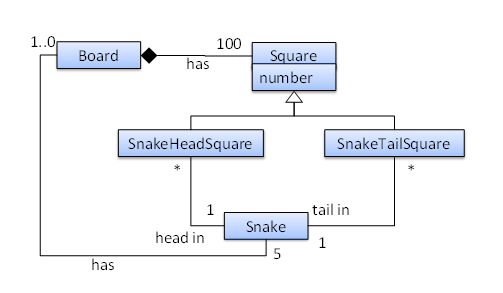
- a. A
Snakemust belong to at least oneBoard. - b. A
SnakeHeadSquarecan contain only oneSnakehead. - c. A
Squarecan contain aSnakehead. - d. A
Snakehead can be in more than oneSnakeHeadSquare - e. The
Boardhas exactly 5Snakes.
(a)(b)(c)(d)(e)
Explanation:
(a) does not match because a Snake may or may not belong to a Board (multiplicity is 0..1)
(b) matches the diagram because the multiplicity given in 1
(c) matches the diagram because SnakeHeadSquare is a Square (due to inheritance)
(d) matches the diagram because the multiplicity given is *
(e) matches the diagram because the multiplicity given in 5
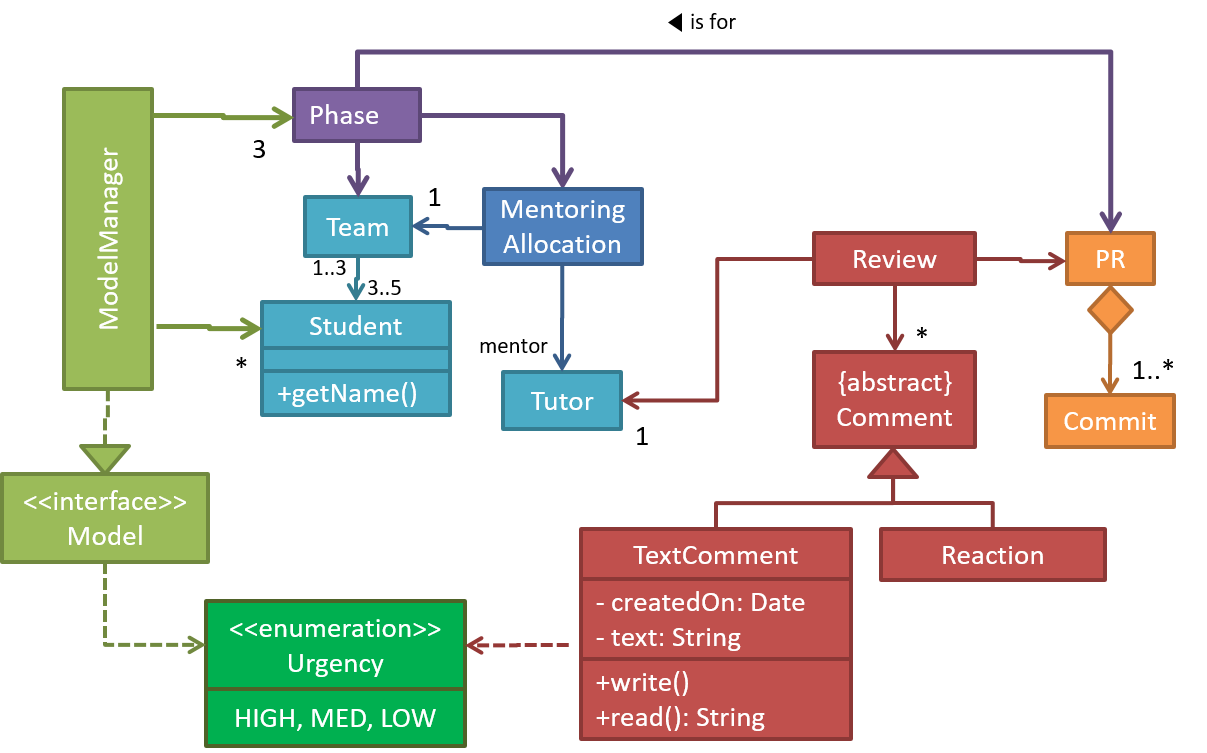
Explain the meaning of various class diagram notations in the following class diagram:
Consider the code below:
public interface Billable {
    void bill();
}
public abstract class Item
         implements Billable {
    public abstract void print();
}
public class StockItem extends Item {
    private Review review;
    private String name;

    public StockItem(
        String name, Rating rating){

        this.name = name;
        this.review = new Review(rating);
    }

    @Override
    public void print() {
        //...
    }

    @Override
    public void bill() {
        //...
    }
}
public enum Rating {
    GOOD, OK, POOR
}
public class Review {
    private final Rating rating;

    public Review(Rating rating) {
        this.rating = rating;
    }
}
import java.util.List;

public class Inventory {
    private List<Item> items;

    public int getItemCount(){
        return items.size();
    }

    public void generateBill(Billable b){
        // ...
    }

    public void add(Item s) {
        items.add(s);
    }
}
(a) Draw a class diagram to represent the code
(b) Draw an object diagram to represent the situation where the inventory has one item with a name spanner and a review of POOR rating.
W6.2 Can use basic-level sequence diagrams
W6.2a Can draw basic sequence diagrams
Design → Modelling → Modelling Behaviors
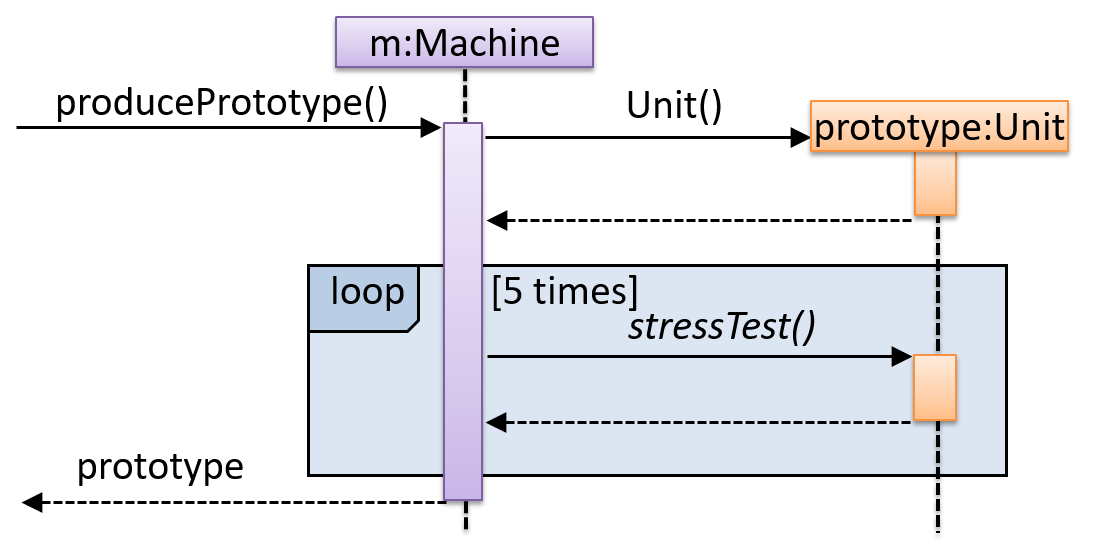
Explain in your own words the interactions illustrated by this Sequence Diagram:
Consider the code below:
class Person{
    Tag tag;
    String name;

    Person(String personName, String tagName){
        name = personName;
        tag = new Tag(tagName);
    }
}
class Tag{
    Tag(String value){
        //...
    }
}

class PersonList{
    void addPerson(Person p){
        //...
    }
}
Draw a sequence diagram to illustrate the object interactions that happen in the code snippet below:
PersonList personList = new PersonList();
while (hasRoom){
    Person p = new Person("Adam", "friend");
    personList.addPerson(p);
}
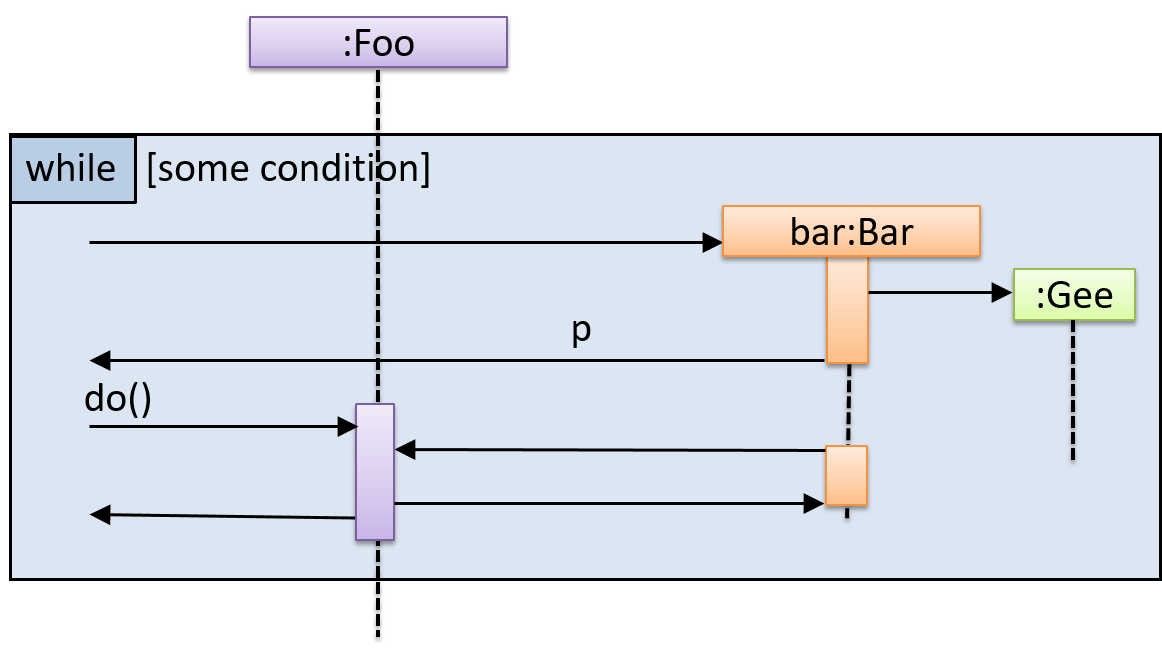
Find notation mistakes in the sequence diagram below:
Evidence:
Consider the code below:
class Person{
    Tag tag;
    String name;

    Person(String personName, String tagName){
        name = personName;
        tag = new Tag(tagName);
    }
}
class Tag{
    Tag(String value){
        //...
    }
}

class PersonList{
    void addPerson(Person p){
        //...
    }
}
Draw a sequence diagram to illustrate the object interactions that happen in the code snippet below:
PersonList personList = new PersonList();
while (hasRoom){
    Person p = new Person("Adam", "friend");
    personList.addPerson(p);
}
W6.3 Can interpret an architecture diagram
W6.3a Can explain what is software design
Design → Introduction →
Design in the creative process of transforming the problem into a solution; the solution is also called design. -- 📖 Software Engineering Theory and Practice, Shari Lawrence; Atlee, Joanne M. Pfleeger
Software design has two main aspects:
- Product/external design: designing the external behavior of the product to meet the users' requirements. This is usually done by product designers with the input from business analysts, user experience experts, user representatives, etc.
- Implementation/internal design: designing how the product will be implemented to meet the required external behavior. This is usually done by software architects and software engineers.
W6.3b Can interpret an architecture diagram
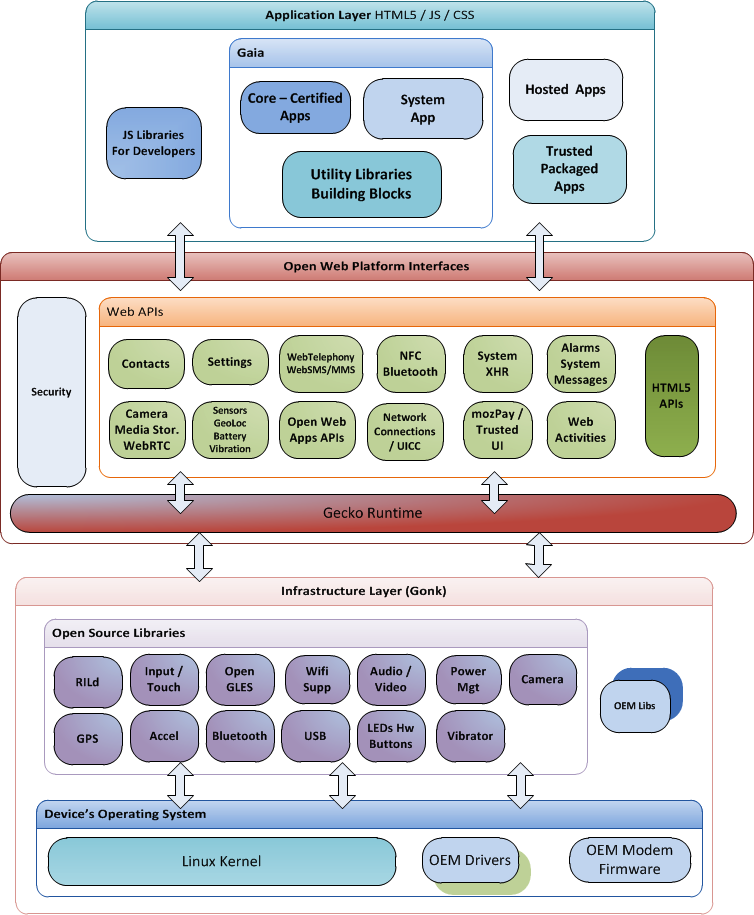
Design → Architecture → Architecture Diagrams →
Architecture diagrams are free-form diagrams. There is no universally adopted standard notation for architecture diagrams. Any symbol that reasonably describes the architecture may be used.
Some example architecture diagrams:


source: https://commons.wikimedia.org
source: https://commons.wikimedia.org

source: https://commons.wikimedia.org
W6.3c Can explain multi-level design
Design → Introduction →
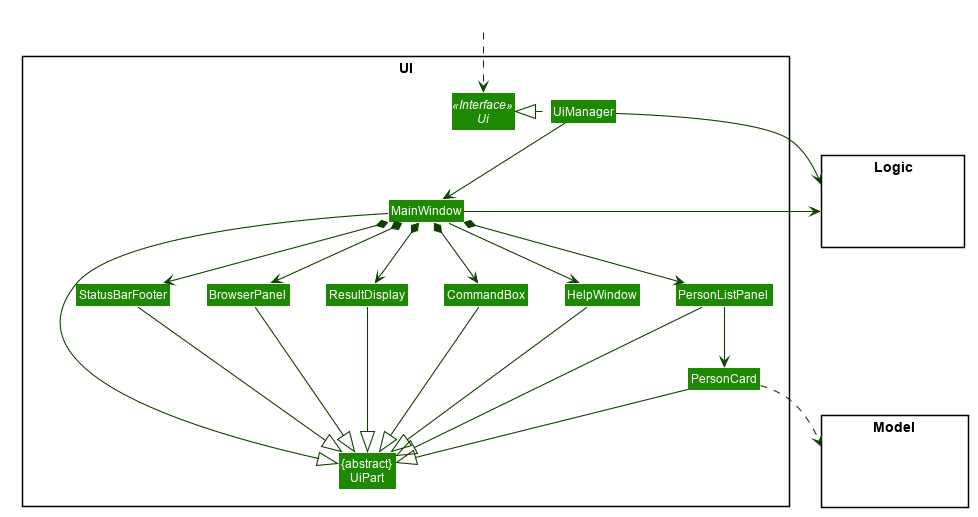
In a smaller system, design of the entire system can be shown in one place.
This class diagram of se-edu/addressbook-level3 depicts the design of the entire software.

Design of bigger systems needs to be done/shown at multiple levels.
This architecture diagram of se-edu/addressbook-level4 depicts the high-level design of the software.
Here are examples of lower level designs of some components of the same software:

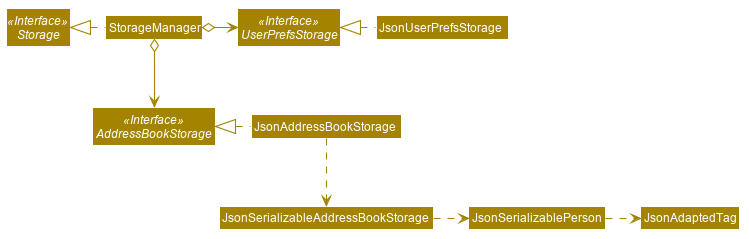
Evidence:
Covered by the project. In particular, when getting started on modifying AB-4, you are recommended to start by doing local changes (i.e., changes local to a component) first and then move to global changes (i.e., changes that touch multiple components). As AB-4 users multi-level design, you should be able to do most of the local changes without having to learn internal details of the other components.
Implementation
W6.4 Can use logging
W6.4a Can explain logging
Implementation → Error Handling → Logging →
Logging is the deliberate recording of certain information during a program execution for future reference. Logs are typically written to a log file but it is also possible to log information in other ways e.g. into a database or a remote server.
Logging can be useful for troubleshooting problems. A good logging system records some system information regularly. When bad things happen to a system e.g. an unanticipated failure, their associated log files may provide indications of what went wrong and action can then be taken to prevent it from happening again.
💡 A log file is like the

Why is logging like having the 'black box' in an airplane?
(a)
W6.4b Can use logging
Implementation → Error Handling → Logging →
Most programming environments come with logging systems that allow sophisticated forms of logging. They have features such as the ability to enable and disable logging easily or to change the logging
This sample Java code uses Java’s default logging mechanism.
First, import the relevant Java package:
import java.util.logging.*;
Next, create a Logger:
private static Logger logger = Logger.getLogger("Foo");
Now, you can use the Logger object to log information. Note the use of WARNING so that log messages specified as INFO level (which is a lower level than WARNING) will not be written to the log file at all.
// log a message at INFO level
logger.log(Level.INFO, "going to start processing");
//...
processInput();
if(error){
    //log a message at WARNING level
    logger.log(Level.WARNING, "processing error", ex);
}
//...
logger.log(Level.INFO, "end of processing");
Tutorials:
- Java Logging API - Tutorial -- A tutorial by Lars Vogella
- Java Logging Tutorial -- An alternative tutorial by Jakob Jenkov
- A video tutorial by SimplyCoded:
Best Practices:
- 10 Tips for Proper Application Logging -- by Tomasz Nurkiewicz
- What each logging level means -- conventions recommended by Apache Project
Evidence:
Use of logging in the code you have written in the module project or elsewhere.
W6.5 Can use assertions
W6.5a Can explain assertions
Implementation → Error Handling → Assertions →
Assertions are used to define assumptions about the program state so that the runtime can verify them. An assertion failure indicates a possible bug in the code because the code has resulted in a program state that violates an assumption about how the code should behave.
An assertion can be used to express something like when the execution comes to this point, the variable v cannot be null.
If the runtime detects an assertion failure, it typically take some drastic action such as terminating the execution with an error message. This is because an assertion failure indicates a possible bug and the sooner the execution stops, the safer it is.
In the Java code below, suppose we set an assertion that timeout returned by Config.getTimeout() is greater than 0. Now, if the Config.getTimeout() returned -1 in a specific execution of this line, the runtime can detect it as a assertion failure -- i.e. an assumption about the expected behavior of the code turned out to be wrong which could potentially be the result of a bug -- and take some drastic action such as terminating the execution.
int timeout = Config.getTimeout();
W6.5b Can use assertions
Implementation → Error Handling → Assertions →
Use the assert keyword to define assertions.
This assertion will fail with the message x should be 0 if x is not 0 at this point.
x = getX();
assert x == 0 : "x should be 0";
...
Assertions can be disabled without modifying the code.
java -enableassertions HelloWorld (or java -ea HelloWorld) will run HelloWorld with assertions enabled while java -disableassertions HelloWorld will run it without verifying assertions.
Java disables assertions by default. This could create a situation where you think all assertions are being verified as true while in fact they are not being verified at all. Therefore, remember to enable assertions when you run the program if you want them to be in effect.
💡 Enable assertions in Intellij (how?) and get an assertion to fail temporarily (e.g. insert an assert false into the code temporarily) to confirm assertions are being verified.
Java assert vs JUnit assertions: They are similar in purpose but JUnit assertions are more powerful and customized for testing. In addition, JUnit assertions are not disabled by default. We recommend you use JUnit assertions in test code and Java assert in functional code.
Tutorials:
- Java Assertions -- a simple tutorial from javatpoint.com
- Programming with Assertions (first half) -- a more detailed tutorial from Oracle
Best practices:
- Programming with Assertions (second half) -- from Oracle (also listed above as a tutorial) contains some best practices towards the end of the article.
Evidence:
Explain assertions in AddressBook-Level4 code.
W6.5c Can use assertions optimally
Implementation → Error Handling → Assertions →
It is recommended that assertions be used liberally in the code. Their impact on performance is considered low and worth the additional safety they provide.
Do not use assertions to do work because assertions can be disabled. If not, your program will stop working when assertions are not enabled.
The code below will not invoke the writeFile() method when assertions are disabled. If that method is performing some work that is necessary for your program, your program will not work correctly when assertions are disabled.
...
assert writeFile() : "File writing is supposed to return true";
Assertions are suitable for verifying assumptions about Internal Invariants, Control-Flow Invariants, Preconditions, Postconditions, and Class Invariants. Refer to [Programming with Assertions (second half)] to learn more.
Exceptions and assertions are two complementary ways of handling errors in software but they serve different purposes. Therefore, both assertions and exceptions should be used in code.
- The raising of an exception indicates an unusual condition created by the user (e.g. user inputs an unacceptable input) or the environment (e.g., a file needed for the program is missing).
- An assertion failure indicates the programmer made a mistake in the code (e.g., a null value is returned from a method that is not supposed to return null under any circumstances).
A Calculator program crashes with an ‘assertion failure’ message when you try to find the square root of a negative number.
(c)
Explanation: An assertion failure indicates a bug in the code. (b) is not acceptable because of the word "terminated". The application should not fail at all for this input. But it could have used an exception to handle the situation internally.
Which statements are correct?
- a. Use assertions to indicate the programmer messed up; Use exceptions to indicate the user or the environment messed up.
- b. Use exceptions to indicate the programmer messed up; Use assertions to indicate the user or the environment messed up.
(a)
Evidence:
Give an example from the AddressBook-Level4 code where an exception is used and explain why an assertion is not suitable for that situation. Similarly, explain why an exception is not suitable for a place where AddressBook Level4 uses an assertion.
W6.6 Can use Java8 streams
W6.6a Can use Java8 streams :
Tools → Java →
Java 8 introduced a number of new features (e.g. Lambdas, Streams) that are not trivial to learn but also extremely useful to know.
Here is an overview of new Java 8 features . (written by Benjamin Winterberg)
Tutorials:
- Java 8 Tutorial -- from tutorialspoint.com. 💡 Also provides a way to try out code online
- Tutorials from Oracle: [Lambdas][Streams]
A video tutorial by well-known Java coach Venkat Subramaniam
Evidence:
Some code you have written (can be toy examples) that uses some Java 8 features.
W6.7 Can use JavaFX to build a simple GUI
W6.7a Can use JavaFX to build a simple GUI
Tools → Java →
Adapted (with permissions) from Marco Jakob's JavaFX 8 tutorial.
JavaFx 9 Tutorial - Part 1: Scene Builder
Introduction
This tutorial will teach you how to create a new JavaFX application in IntelliJ, and to use the SceneBuilder to create a layouts for your application.
Prerequisites
- Latest Java JDK 9 (includes JavaFX 9)
- IntelliJ (2018.2 or later)
- SceneBuilder 8 (provided by Gluon as Oracle no longer ships the tool in binary form)
Do remember the installation path to SceneBuilder 8 as we will need it to configure IntelliJ in a later step.
IntelliJ Configurations
If this is the first time using IntelliJ, you need to tell IntelliJ where to find JDK 9 and SceneBuilder.
Configuring JDK 9
- On the Welcome screen, press
Configure→Project Default→Project Structure.
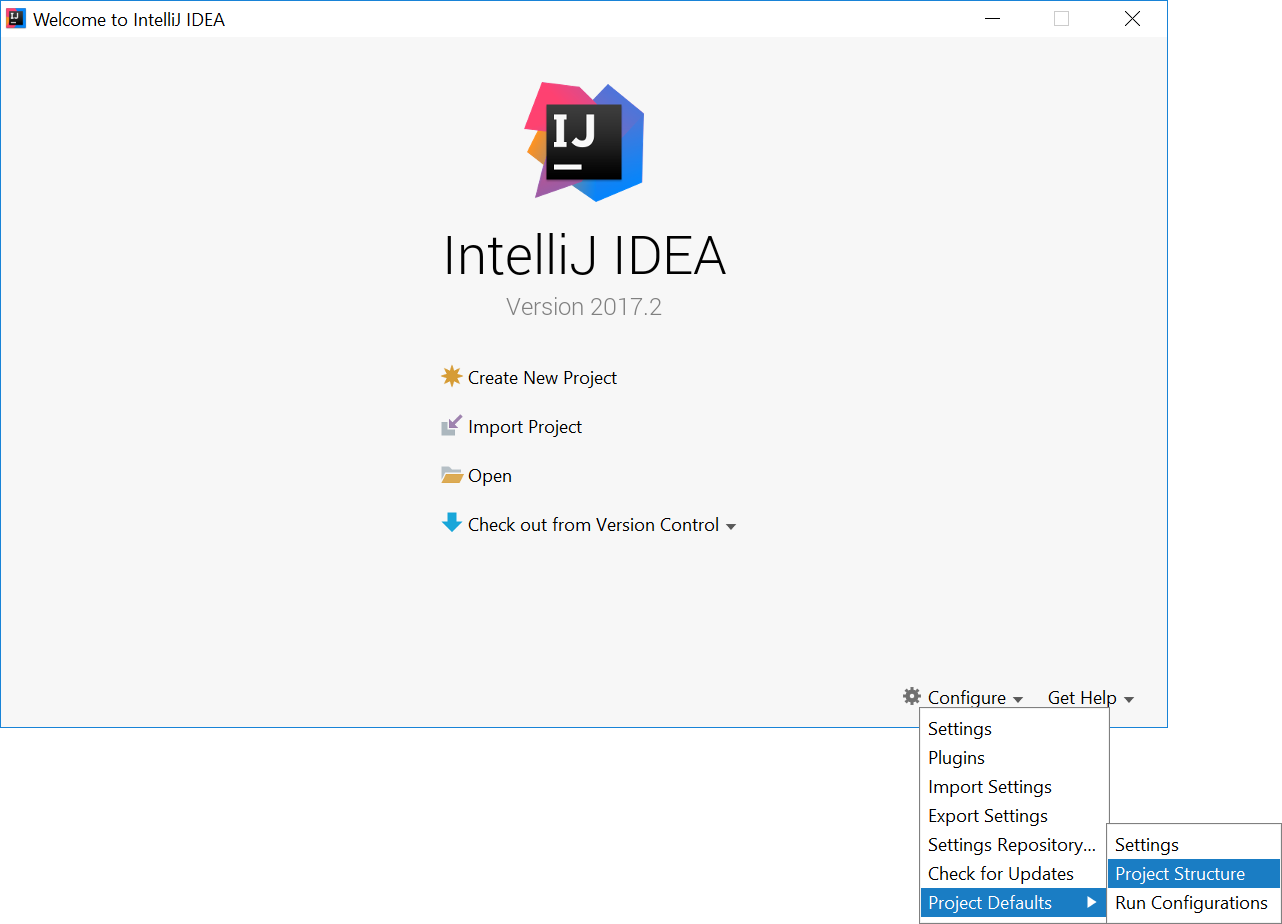
- If you already have a project open, go to the Welcome screen by going to
File→Close Project.
- Under
Project SDK:, pressNew...→JDK. - Select the directory that you install JDK on, and press
OK. - Under
Project language level:, select9 - Modules, private methods in interfaces etc..
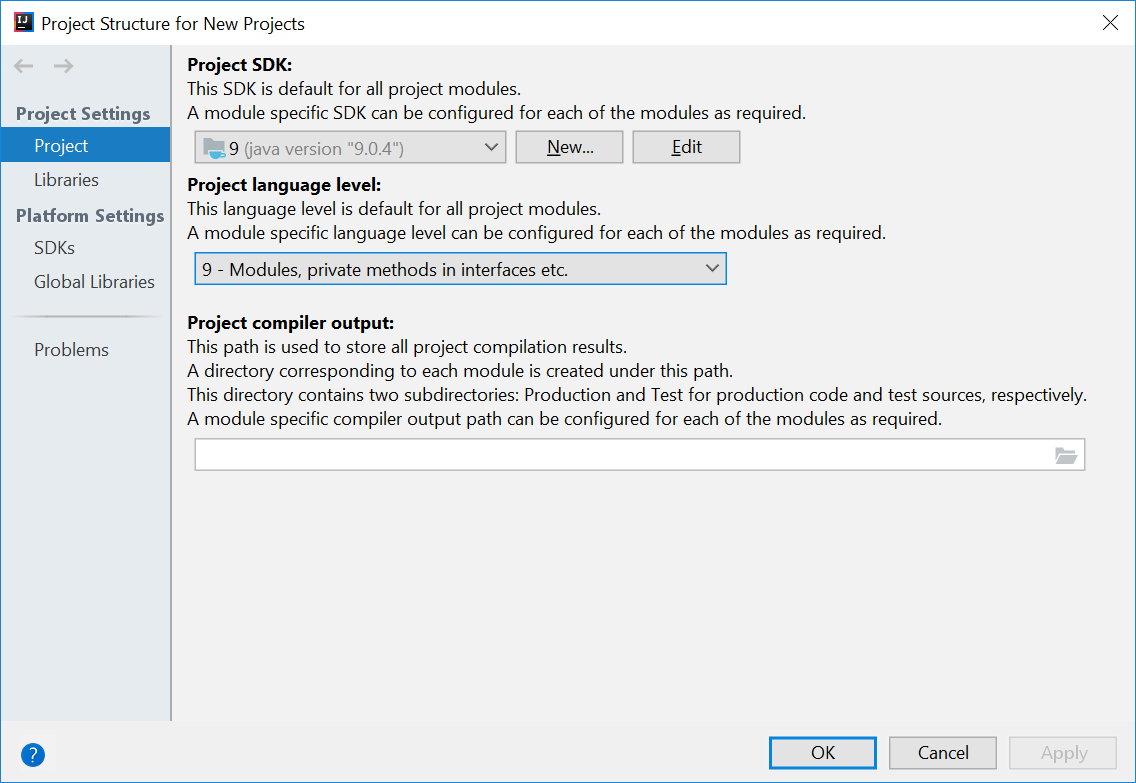
- Press
OKagain.
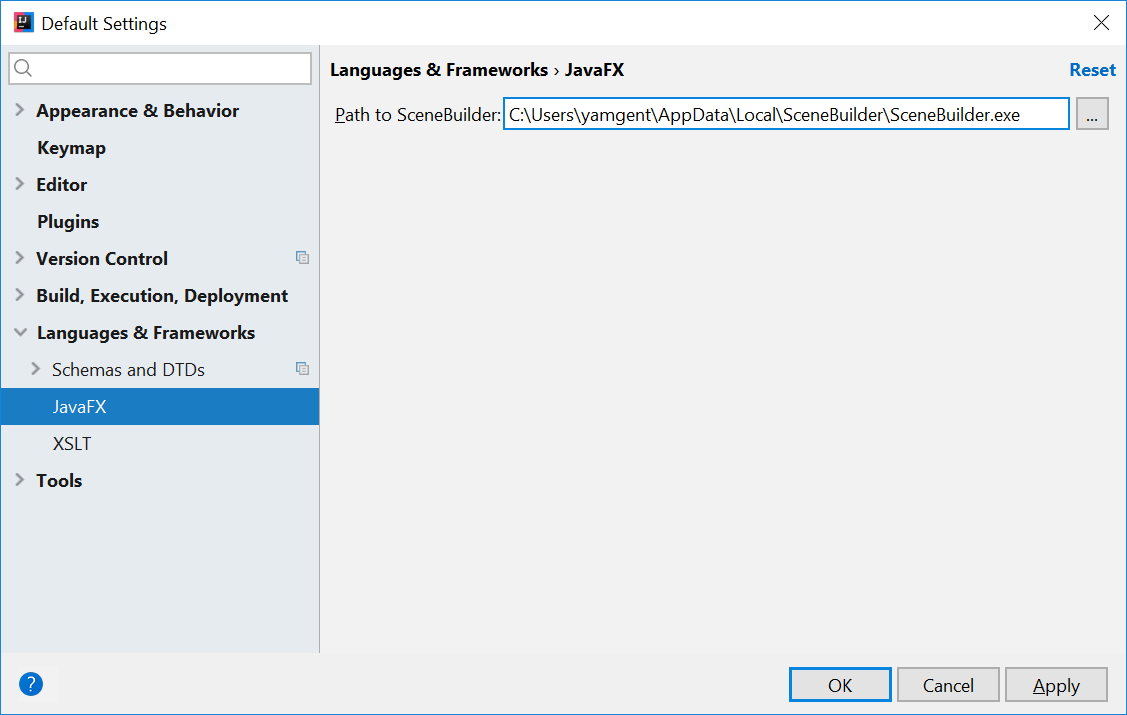
Configuring Scene Builder
- On the Welcome screen, press
Configure→Settings. - On the left hand side, select
Languages & Frameworks→JavaFX - Under
Path to SceneBuilder:, select the path to where SceneBuilder is installed (e.g.C:\Users\Admin\AppData\Local\SceneBuilder\SceneBuilder.exeon Windows)
The JavaDocs will come in handy when writing your own JavaFX applications:
Additionally, Oracle also has a tutorial on JavaFX if you are interested.
Create a new JavaFX Project
- On the Welcome screen, press
Create New Project.
- If you already have a project, you can create a new project by going
File→New→Project....
- On the left side, select
JavaFX. Make sure that the Project SDK is set to9andJavaFX Applicationis selected.
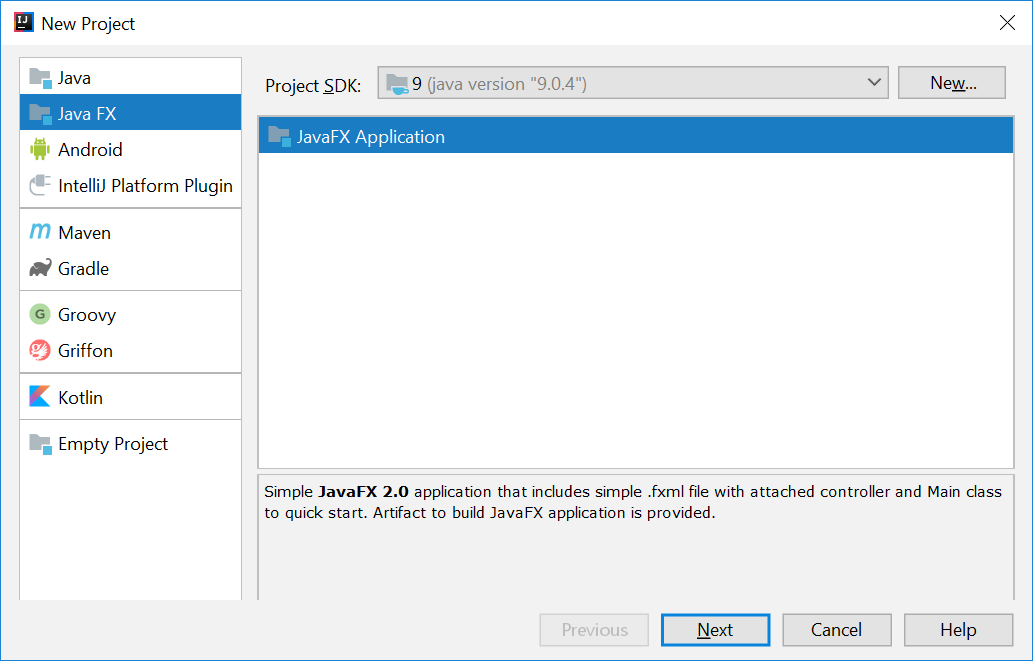
- Press
Next. - Give a name for the application (e.g.
AddressApp), and specify a suitable location. - Press
Finish. If prompted to create a new directory, just pressOK.
Remove the sample package and its content. We will manually create our own package and resources in our tutorial.
We will also have to set up the IDE further, so that warnings and errors show up correctly when working with Java 9:
- Go to the menu
File→Project Structure. - Under
Project language level:, ensure that9 - Modules, private methods in interfaces etc.is selected.
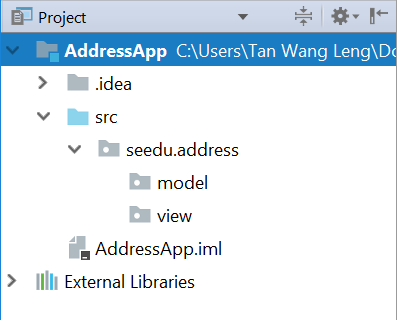
Create the Packages
In We will create a package for each of the component. Ensure that your Project pane is open (Alt+1). Right click on the src folder, and select New → Package:
seedu.address- contains the controller classes (i.e. the part that deals with the business logic)seedu.address.model- contains the model classes (i.e. the part that deals with data)seedu.address.view- contains the views (i.e. the part that deals with presenting the data to the user)
In subsequent tutorials, our view package will also contain some controllers that are directly related to a single view. We will call them view-controllers.
Create the FXML Layout File
There are two ways to create the UI:
- Use FXML, which is an XML format.
- Programmatically create the interface in Java.
We will use FXML for most parts, so that we can separate the view and controller from each other. Furthermore, we are able to use the Scene Builder tool to edit our FXML file. That means we will not have to directly work with XML.
Right click on the view package, and press New → FXML file. For the file name, type PersonOverview.fxml.
Design with Scene Builder
Right-click on PersonOverview.fxml and choose Open with Scene Builder. Now you should see the Scene Builder with just an AnchorPane (visible under Hierarchy on the left).
If IntelliJ prompts for a location of the SceneBuilder executable, make sure to point to where you install SceneBuilder.
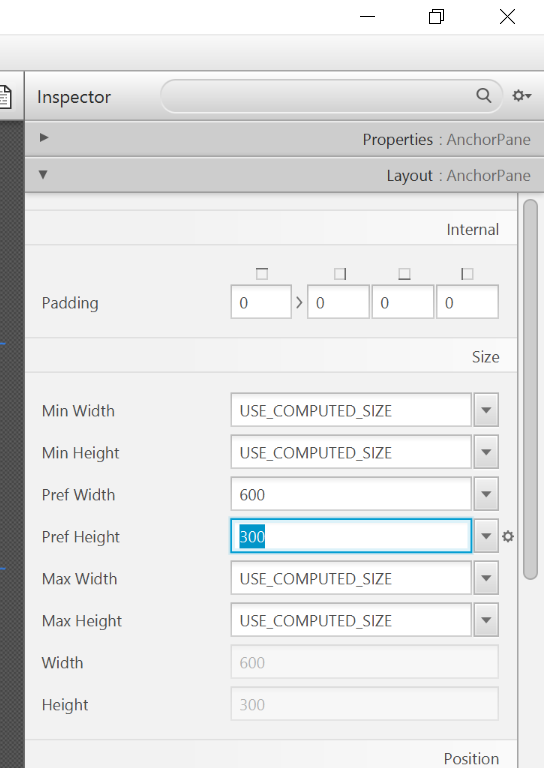
- Select the
Anchor Panein your Hierarchy, and adjust the size under Layout (right side). (Pref Width: 600, Pref Height: 300)
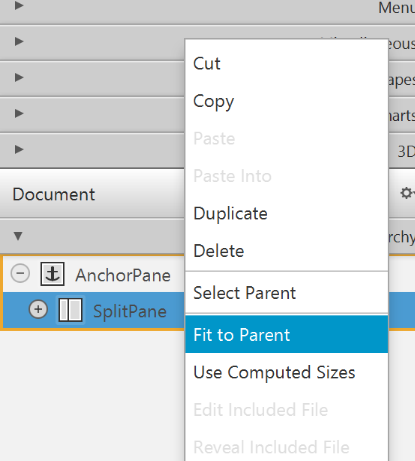
- Add a
Split Pane (horizontal)(underContainers) by dragging it from the Library into the main area. Right-click theSplit Panein the Hierarchy view and selectFit to Parent.
- Drag a
TableView(underControlsin Library view) into the left side of theSplitPane. Select theTableView(not a Column) and set the following layout constraints in the Inspector to theTableView. Inside anAnchorPaneyou can always set anchors to the four borders (see this page for more information on Layouts).
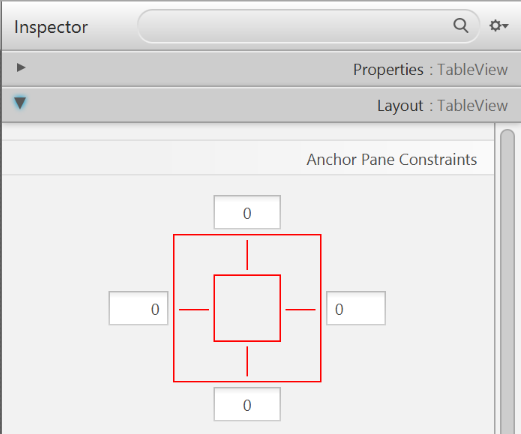
-
Go to the menu
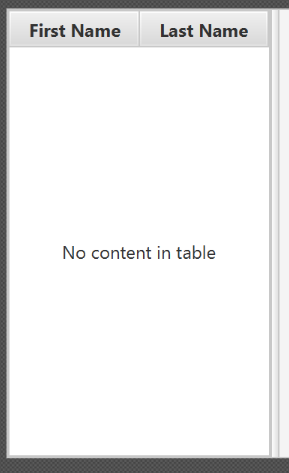
Preview→Show Preview in Windowto see whether the layout configuration is done correctly. Try resizing the window. TheTableViewshould resize together with the window as it is anchored to the borders. -
Change the column text (under Properties) to "First Name" and "Last Name".
- Select the
TableViewand chooseconstrainted-resizefor the 'Column Resize Policy'. This ensures that the columns will always fill up the entire available space.

- Add a
Labelon the right side with the text "Person Details:". Adjust the layout using anchors (Top: 5, Left: 5. Right: Blank, Bottom: Blank).
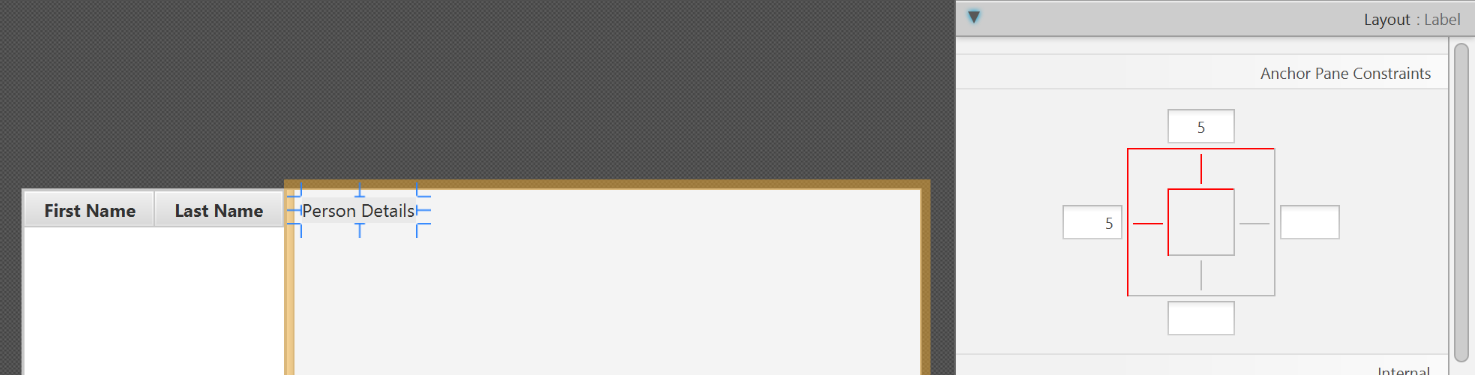
You can use the Search Bar at the top of Library/Inspector to find the respective controls/properties.
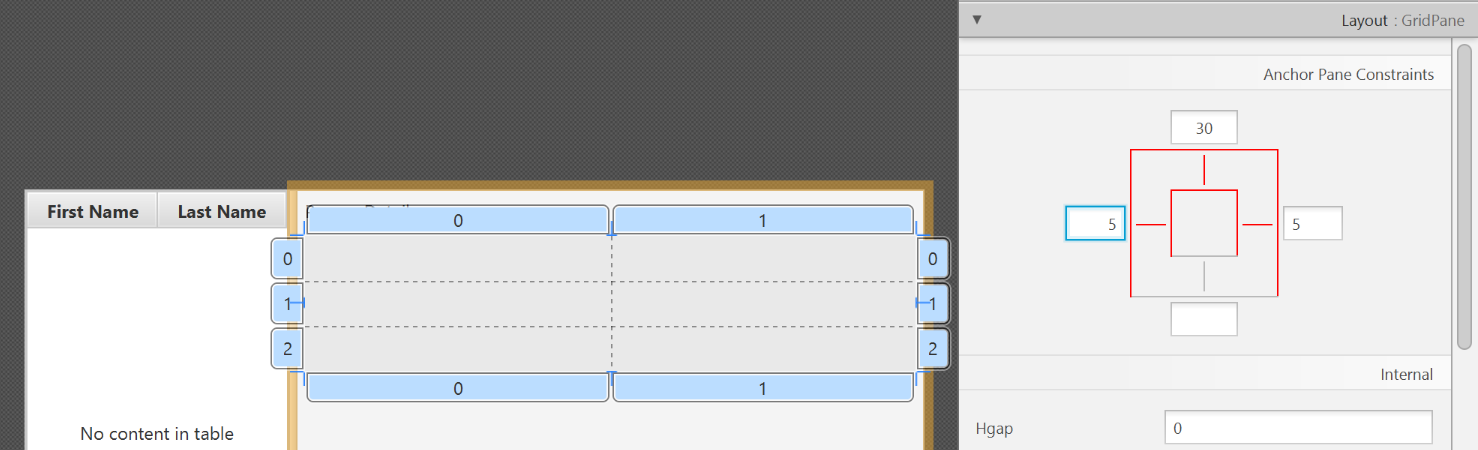
- Add a
GridPaneon the right side. Select it, and adjust its layout using anchors (Top: 30, Left: 5, Right: 5, Bottom: Blank).
- Add the following labels to the cells, such that the grid is of this form:
| First Name | Label |
|---|---|
| Last Name | Label |
| Street | Label |
| City | Label |
| Postal Code | Label |
| Birthday | Label |
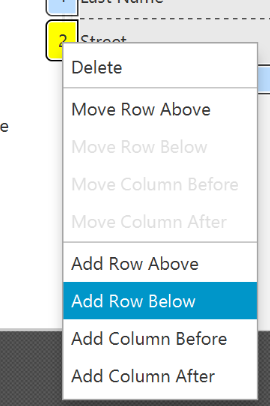
To add a row to the GridPane, select an existing row number, right click the row number and choose "Add Row Below".

- Add a
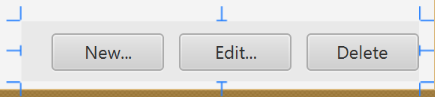
ButtonBarat the bottom. Add three buttons to the bar ("New...", "Edit...","Delete"). Adjust the anchors so that it stays at the bottom right (Top: Blank, Left: Blank, Right: 10, Bottom: 5).
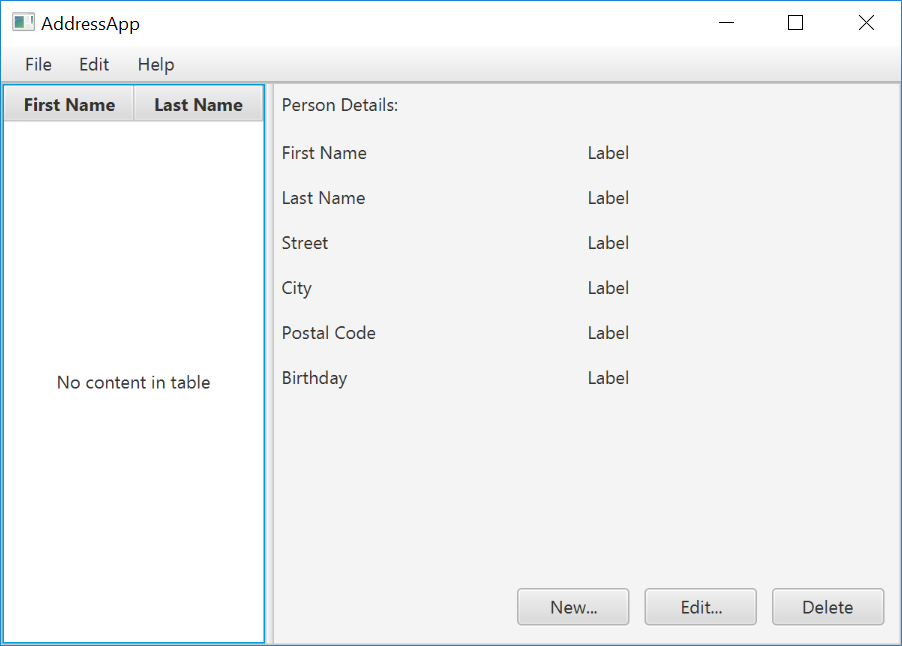
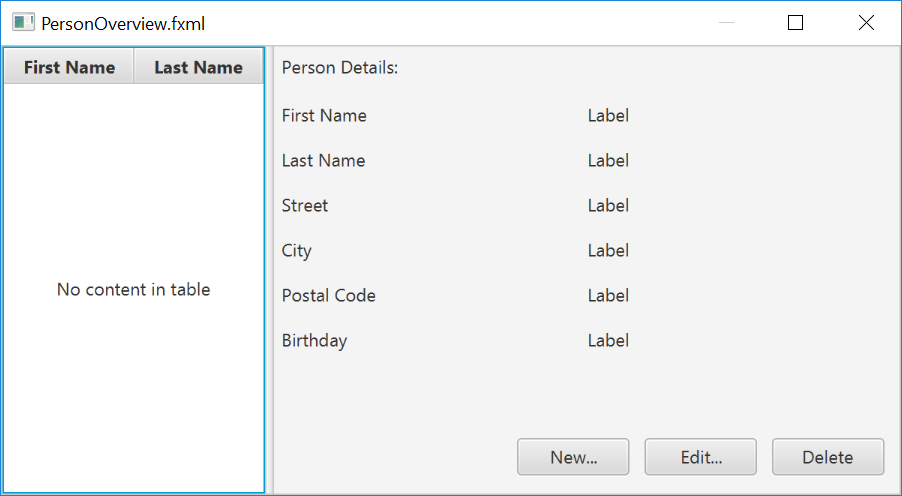
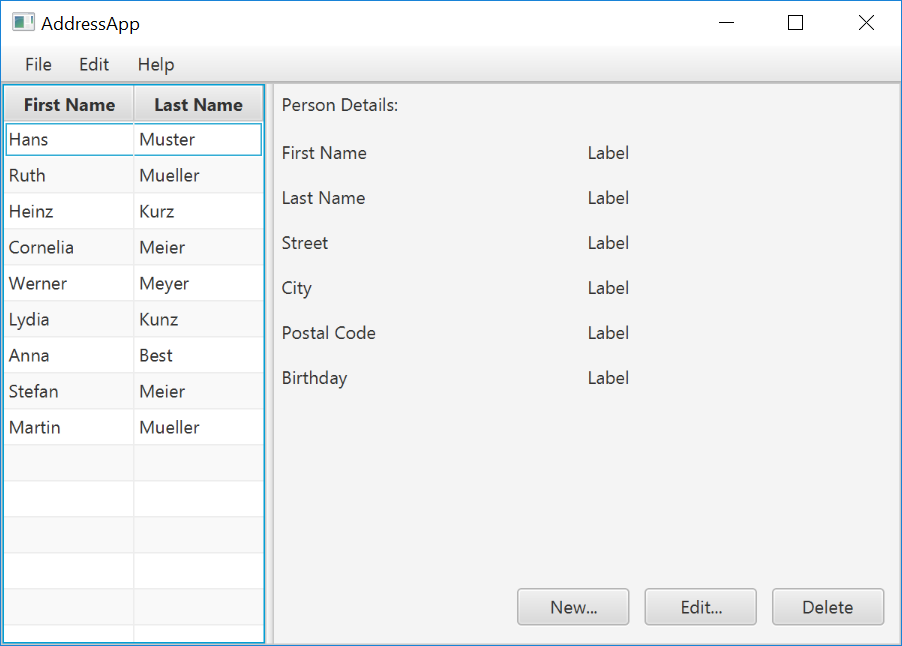
- Now you should see something like the following. Use the
Previewmenu to test its resizing behaviour.
- Save the
.fxmlfile.
Create the Main Application
The PersonOverview.fxml that we just created only contains the content of our entire application. We need another FXML for our root layout, which will contain a menu bar and wraps PersonOverview.fxml.
- Inside IntelliJ, right click on the
viewpackage, and pressNew→FXML file. For the file name, typeRootLayout.fxml. - Right-click on
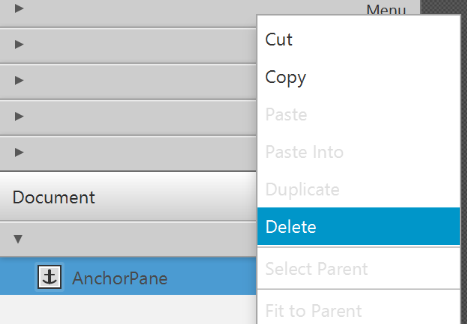
RootLayout.fxmland chooseOpen with Scene Builder. - Delete the
AnchorPane. We will use another pane for our root layout.
- Add
BorderPaneby dragging it from the Library view into the main area.
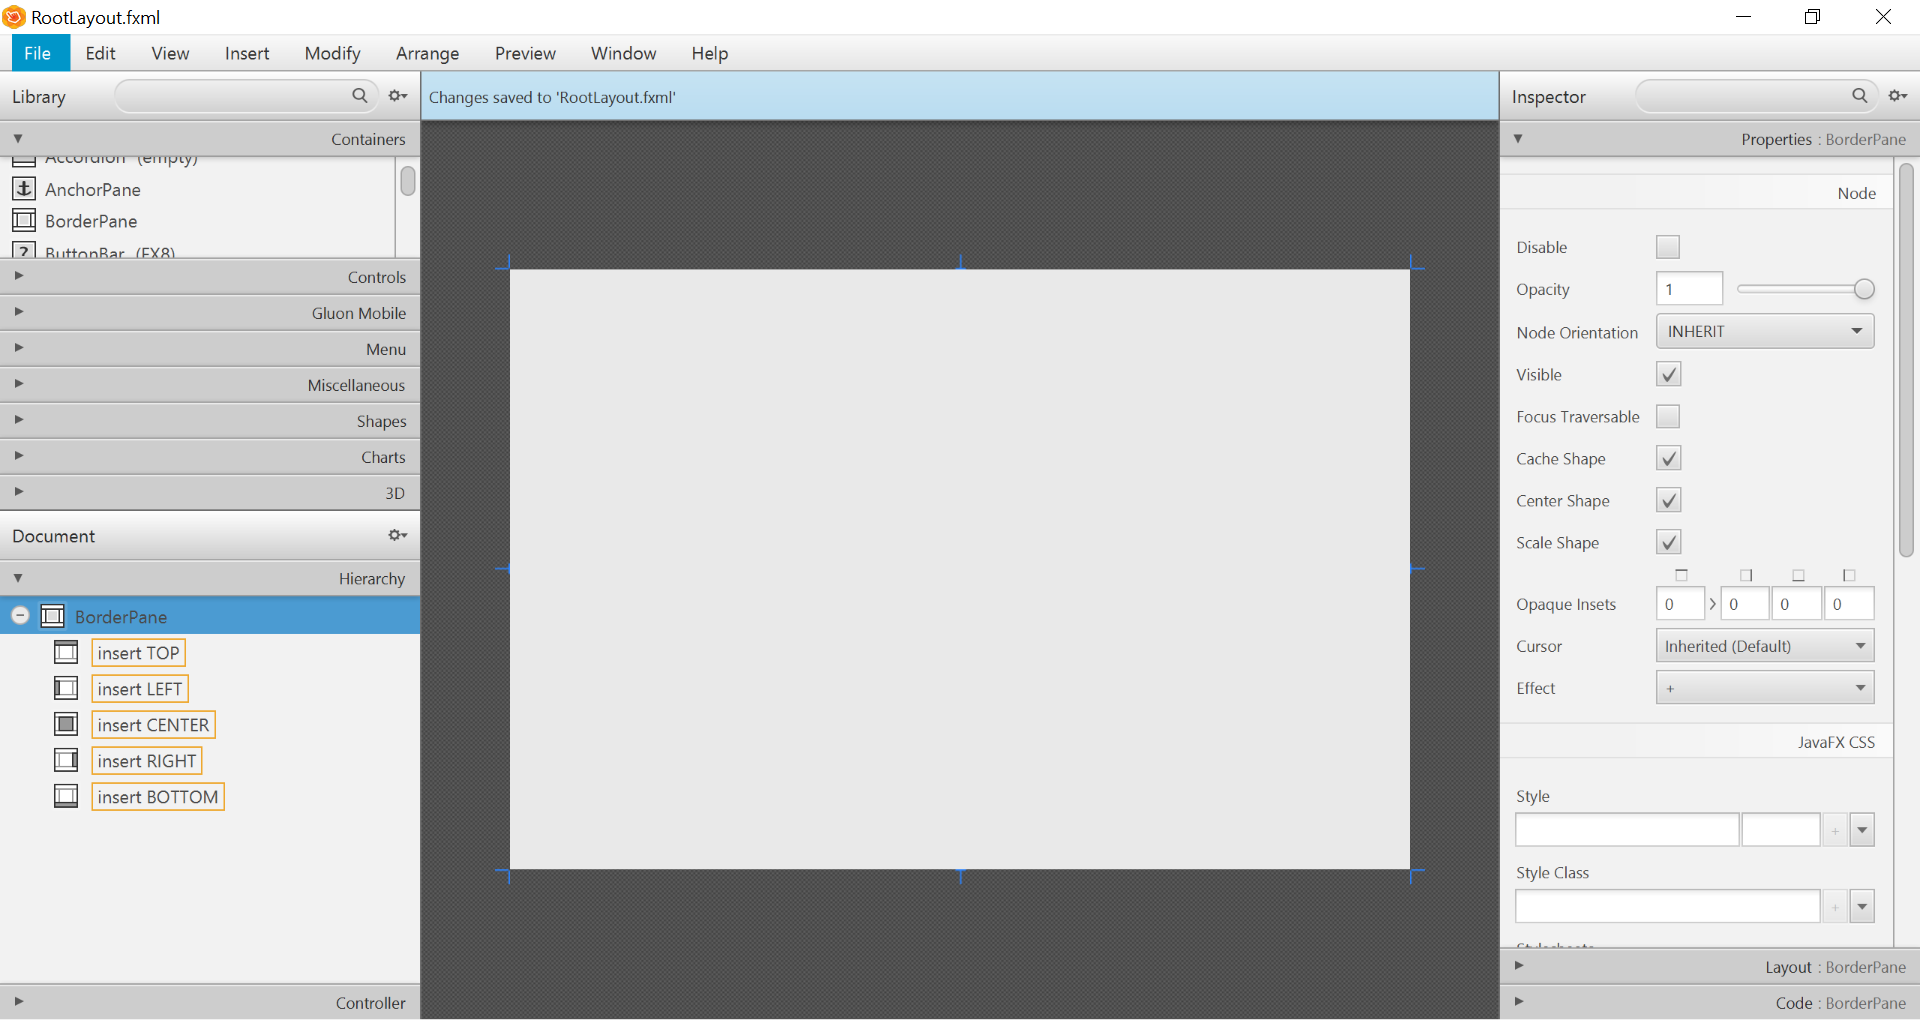
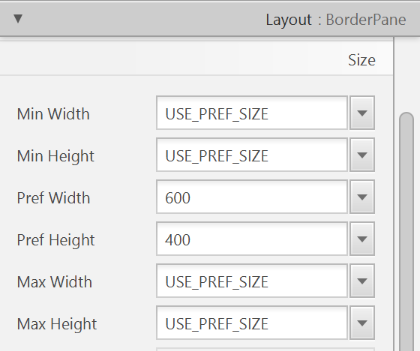
- Resize the
BorderPane(Pref Width: 600, Pref Height: 400)
- Add a
MenuBarinto theinsert TOPslot. We will not implement menu functionality for now.

The JavaFX Main Class
Now, we need to create the main Java class that starts up our application with the RootLayout.fxml and adds the PersonOverview.fxml in the center.
Right-click on your seedu.address package, and choose New → JavaFXApplication. For the class name, type MainApp.
The generated MainApp.java class extends from Application and contains two methods. This is the basic structure that we need to start a JavaFX Application. The most important part for us is the start(Stage primaryStage) method. It is automatically called when the application is launch() from within the main() method.
As you see, the start(...) method receives a Stage as parameter. The following graphic illustrates the structure of every JavaFX application:
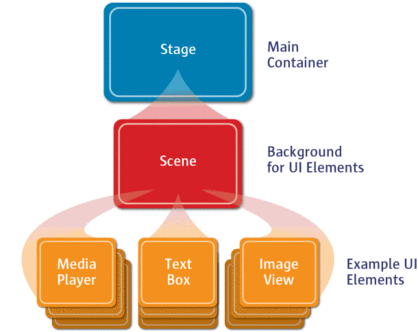
Image Source: http://www.oracle.com
It's like a theater play: The Stage is the main container which is usually a Window with a border and the typical minimize, maximize and close buttons. Inside the Stage you add a Scene which can, of course, be switched out by another Scene. Inside the Scene the actual JavaFX nodes like AnchorPane, TextBox, etc. are added.
See this page for more info on working with the JavaFX Scene Graph.
Open MainApp.java and replace the code with the following:
MainApp.java
package seedu.address;

import java.io.IOException;

import javafx.application.Application;
import javafx.fxml.FXMLLoader;
import javafx.scene.Scene;
import javafx.scene.layout.AnchorPane;
import javafx.scene.layout.BorderPane;
import javafx.stage.Stage;

public class MainApp extends Application {
    private Stage primaryStage;
    private BorderPane rootLayout;

    @Override
    public void start(Stage primaryStage) {
        this.primaryStage = primaryStage;
        this.primaryStage.setTitle("AddressApp");

        initRootLayout();

        showPersonOverview();
    }

    /**
     * Initializes the root layout.
     */
    public void initRootLayout() {
        try {
            // Load root layout from fxml file.
            FXMLLoader loader = new FXMLLoader();
            loader.setLocation(MainApp.class.getResource("view/RootLayout.fxml"));
            rootLayout = loader.load();

            // Show the scene containing the root layout.
            Scene scene = new Scene(rootLayout);
            primaryStage.setScene(scene);
            primaryStage.show();
        } catch (IOException e) {
            e.printStackTrace();
        }
    }

    /**
     * Shows the person overview inside the root layout.
     */
    public void showPersonOverview() {
        try {
            // Load person overview.
            FXMLLoader loader = new FXMLLoader();
            loader.setLocation(MainApp.class.getResource("view/PersonOverview.fxml"));
            AnchorPane personOverview = loader.load();

            // Set person overview into the center of root layout.
            rootLayout.setCenter(personOverview);
        } catch (IOException e) {
            e.printStackTrace();
        }
    }

    /**
     * Returns the main stage.
     */
    public Stage getPrimaryStage() {
        return primaryStage;
    }

    public static void main(String[] args) {
        launch(args);
    }
}
The various comments should give you some hints about what's going on.
Importing JavaFx 9
JavaFx 9 is a separate module from Java 9. We must ensure that the modules are imported correctly.
Notice that IntellJ will complain about the imported modules "not being in the module graph":
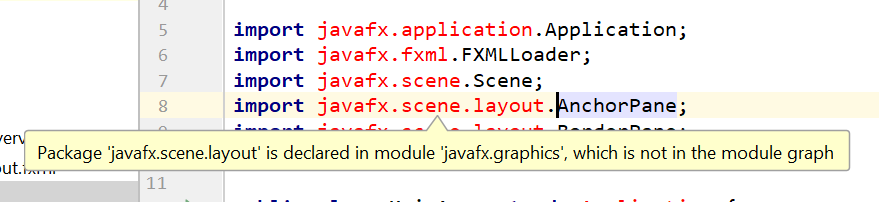
To fix this:
- Ensure that your Project pane is open (Alt+1). Right click on the
srcfolder, and selectNew→module-info.java: - Add the following
requiresandexportsin order to import and export the modules correctly:
module AddressApp {
    requires javafx.graphics;
    requires javafx.fxml;
    requires javafx.controls;

    exports seedu.address;
}
Running the Application
If you run the application now (right click MainApp.java and select Run MainApp.main()), you should see something like this:
Possible Issues
If JavaFx fails to load PersonOverview.fxml, you might get the following error message:
javafx.fxml.LoadException:
/.../AddressApp/out/production/AddressApp/seedu/address/view/PersonOverview.fxml:15
To solve this issue, open PersonOverview.fxml normally in IntelliJ and ensure that there is no such attribute around:
fx:controller="seedu.address.view.PersonOverview"
JavaFx 9 tutorial - Part 2: Model and TableView
Introduction
In this tutorial, we will create the other parts of the application (mainly the model and the controller). We will also use ObservableList and *Property to bind our list of new model's Persons, and their individual details, to the view, with the controller as the "middleman".
Create the Model class
We need a model class in order to hold information about the people in our address book. Add a new class to the model package (seedu.address.model) called Person. The Person class will encapsulate the details of an individual person such as name, address and birthday. Add the following code to the class. The JavaFX specifics will be explained after the code snippet.
Person.java
package seedu.address.model;

import java.time.LocalDate;

import javafx.beans.property.IntegerProperty;
import javafx.beans.property.ObjectProperty;
import javafx.beans.property.SimpleIntegerProperty;
import javafx.beans.property.SimpleObjectProperty;
import javafx.beans.property.SimpleStringProperty;
import javafx.beans.property.StringProperty;

/**
 * Model class for a Person.
 */
public class Person {

    private final StringProperty firstName;
    private final StringProperty lastName;
    private final StringProperty street;
    private final IntegerProperty postalCode;
    private final StringProperty city;
    private final ObjectProperty< LocalDate > birthday;

    /**
     * Default constructor.
     */
    public Person() {
        this(null, null);
    }

    /**
     * Constructor with some initial data.
     */
    public Person(String firstName, String lastName) {
        this.firstName = new SimpleStringProperty(firstName);
        this.lastName = new SimpleStringProperty(lastName);

        // Some initial dummy data, just for convenient testing.
        this.street = new SimpleStringProperty("some street");
        this.postalCode = new SimpleIntegerProperty(1234);
        this.city = new SimpleStringProperty("some city");
        this.birthday = new SimpleObjectProperty< LocalDate >(LocalDate.of(1999, 2, 21));
    }

    public String getFirstName() {
        return firstName.get();
    }

    public void setFirstName(String firstName) {
        this.firstName.set(firstName);
    }

    public StringProperty firstNameProperty() {
        return firstName;
    }

    public String getLastName() {
        return lastName.get();
    }

    public void setLastName(String lastName) {
        this.lastName.set(lastName);
    }

    public StringProperty lastNameProperty() {
        return lastName;
    }

    public String getStreet() {
        return street.get();
    }

    public void setStreet(String street) {
        this.street.set(street);
    }

    public StringProperty streetProperty() {
        return street;
    }

    public int getPostalCode() {
        return postalCode.get();
    }

    public void setPostalCode(int postalCode) {
        this.postalCode.set(postalCode);
    }

    public IntegerProperty postalCodeProperty() {
        return postalCode;
    }

    public String getCity() {
        return city.get();
    }

    public void setCity(String city) {
        this.city.set(city);
    }

    public StringProperty cityProperty() {
        return city;
    }

    public LocalDate getBirthday() {
        return birthday.get();
    }

    public void setBirthday(LocalDate birthday) {
        this.birthday.set(birthday);
    }

    public ObjectProperty< LocalDate > birthdayProperty() {
        return birthday;
    }
}
Explanations
- With JavaFX, it is common to use
*Propertyfor all fields of a model class. APropertyallows us, for example, to automatically be notified when thelastNameor any other variable is changed. This helps us keep the view in sync with the data. - To learn more about
*Property, refer to Using JavaFX Properties and Binding LocalDate, the type that we are using forbirthday, is part of the new Date and Time API since JDK 8
A List of Persons
The main data that our application manages is simply a bunch of persons. Let's create a list of Person objects inside the MainApp class. All other controller classes will later get access to that central list inside the MainApp.
ObservableList
We are working with JavaFX view classes that need to be informed about any changes made to the list of persons. This is important, since otherwise the view would not be in sync with the data. For this purpose, JavaFX introduces some new Collection classes.
Among all these collections, we need the ObservableList. To create a new ObservableList, add the following code at the beginning of the MainApp class. We'll also add a constructor that creates some sample data and a public getter method:
MainApp.java
// ... AFTER THE OTHER VARIABLES ...

/**
* The data as an observable list of {@link Person}.
*/
private ObservableList< Person > personData = FXCollections.observableArrayList();

    /**
     * Constructor
     */
    public MainApp() {
        // Add some sample data
        personData.add(new Person("Hans", "Muster"));
        personData.add(new Person("Ruth", "Mueller"));
        personData.add(new Person("Heinz", "Kurz"));
        personData.add(new Person("Cornelia", "Meier"));
        personData.add(new Person("Werner", "Meyer"));
        personData.add(new Person("Lydia", "Kunz"));
        personData.add(new Person("Anna", "Best"));
        personData.add(new Person("Stefan", "Meier"));
        personData.add(new Person("Martin", "Mueller"));
    }

    /**
     * Returns the data as an observable list of {@link Person}.
     */
    public ObservableList< Person > getPersonData() {
        return personData;
    }

    // ... THE REST OF THE CLASS ...
The PersonOverviewController
We have our model and view. Let's get our data into our table. We'll need a controller for our PersonOverview.fxml to act as a "middleman" for the model and view.
Create a normal Java class inside the view package called PersonOverviewController.
Note: We must put the class inside the same package as PersonOverview.fxml, otherwise the SceneBuilder won't be able to find it.
We will add some instance variables that give us access to the table and the labels inside the view. The fields and some methods have a special @FXML annotation. This is necessary in order for the .fxml file to have access to private fields and private methods. After we have everything set up in the .fxml file, the application will automatically fill the variables when the .fxml file is loaded.
So let's add the following code:
Note: Remember to always use the javafx imports, NOT awt or swing.
PersonOverviewController.java
package seedu.address.view;

import javafx.fxml.FXML;
import javafx.scene.control.Label;
import javafx.scene.control.TableColumn;
import javafx.scene.control.TableView;
import seedu.address.MainApp;
import seedu.address.model.Person;

public class PersonOverviewController {
    @FXML
    private TableView< Person> personTable;
    @FXML
    private TableColumn< Person, String> firstNameColumn;
    @FXML
    private TableColumn< Person, String> lastNameColumn;

    @FXML
    private Label firstNameLabel;
    @FXML
    private Label lastNameLabel;
    @FXML
    private Label streetLabel;
    @FXML
    private Label postalCodeLabel;
    @FXML
    private Label cityLabel;
    @FXML
    private Label birthdayLabel;

    // Reference to the main application.
    private MainApp mainApp;

    /**
     * The constructor. It is called before the initialize() method.
     */
    public PersonOverviewController() {
    }

    /**
     * Initializes the controller class. This method is automatically called
     * after the fxml file has been loaded.
     */
    @FXML
    private void initialize() {
        // Initialize the person table with the two columns.
        firstNameColumn.setCellValueFactory(cellData -> cellData.getValue().firstNameProperty());
        lastNameColumn.setCellValueFactory(cellData -> cellData.getValue().lastNameProperty());
    }

    /**
     * Is called by the main application to give a reference back to itself.
     */
    public void setMainApp(MainApp mainApp) {
        this.mainApp = mainApp;

        // Add observable list data to the table
        personTable.setItems(mainApp.getPersonData());
    }
}
Explanations
- All fields and methods where the
.fxmlfile needs access must be annotated with@FXML.- Actually, only if they are private, but it's better to have them private and mark them with the annotation!
- The
initialize()method is automatically called after the.fxmlfile has been loaded. At this time, all the FXML fields should have been initialized already. - The
setCellValueFactory(...)that we set on the table colums are used to determine which field inside thePersonobjects should be used for the particular column. The arrow->indicates that we're using a Java 8 feature called Lambdas. (Another option would be to use aPropertyValueFactory, but this is not type-safe).
Note:
We're only using StringProperty values for our table columns in this example. When you want to use IntegerProperty or DoubleProperty, the setCellValueFactory(...) must have an additional asObject():
myIntegerColumn.setCellValueFactory(cellData ->
    cellData.getValue().myIntegerProperty().asObject());
This is necessary because of a bad design decision of JavaFX (see this discussion for more details).
Connecting MainApp with the PersonOverviewController
The setMainApp(...) method must be called by the MainApp class. This gives us a way to access the MainApp object and get the list of Persons and other things. Add the following three lines to showPersonOverview() the method:
MainApp.java - additional lines to add to showPersonOverview() method
// (.... root layout statement goes here ....)

// Give the controller access to the main app.
    PersonOverviewController controller = loader.getController();
    controller.setMainApp(this);

// (.... catch statement goes here ....)
Your showPersonOverview() method in MainApp should now look like this:
MainApp.java - new showPersonOverview() method
/**
* Shows the person overview inside the root layout.
*/
public void showPersonOverview() {
    try {
        // Load person overview.
        FXMLLoader loader = new FXMLLoader();
        loader.setLocation(MainApp.class.getResource("view/PersonOverview.fxml"));
        AnchorPane personOverview = loader.load();

        // Set person overview into the center of root layout.
        rootLayout.setCenter(personOverview);

        // Give the controller access to the main app.
        PersonOverviewController controller = loader.getController();
        controller.setMainApp(this);
    } catch (IOException e) {
        e.printStackTrace();
    }
}
Hook the View to the controller
We're almost there! But one thing is missing: We haven't told our PersonOverview.fxml file which controller to use, and which element should match to which field inside the controller.
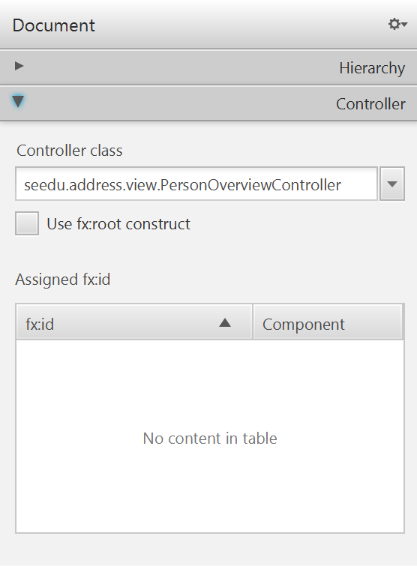
- Open
PersonOverview.fxmlwith the SceneBuilder. - Open the Controller group on the left side (just below Hierarchy), and select the
seedu.address.view.PersonOverviewControlleras the controller class.
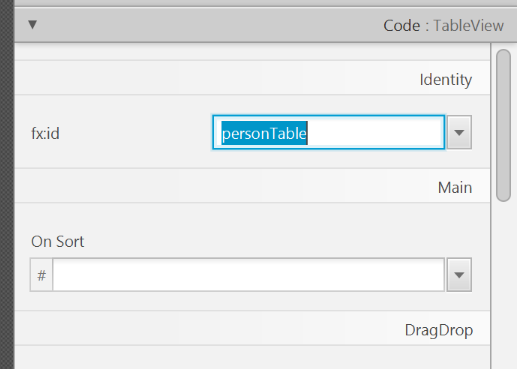
- Select the
TableViewin the Hierarchy group. - In the Inspector view, under the Code group, set 'fx:id' to
personTable.
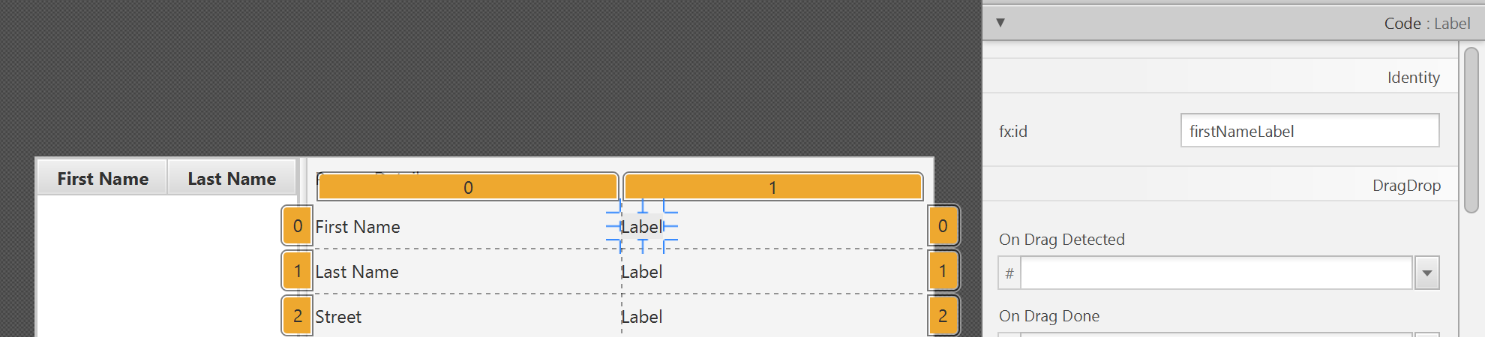
- Do the same for the table columns. Select
firstNameColumnandlastNameColumnfor the 'fx:id' respectively. - For each label in the second column of the grid pane, choose the corresponding 'fx:id'.
- Save the
.fxmlfile.
Opening up the PersonOverviewController to JavaFx
If you try and run the application now, you will encounter the following error:
javafx.fxml.LoadException: ...

...

Caused by: java.lang.IllegalAccessException: class javafx.fxml.FXMLLoader$ValueElement (in module javafx.fxml) cannot access class seedu.address.view.PersonOverviewController (in module AddressApp) because module AddressApp does not export seedu.address.view to module javafx.fxml
This is because JavaFx is unable to access our PersonOverviewController class.
To fix this, add this line of code to src/module-info.java:
module AddressApp {
    ...

    opens seedu.address.view;
}
The file should now look something like this:
module-info.java
module AddressApp {
    requires javafx.graphics;
    requires javafx.fxml;
    requires javafx.controls;

    exports seedu.address;
    opens seedu.address.view;
}
Start the Application
When you start your application now, you should see something like this:
Congratulations! The application now shows the list of Persons in the view!
You may notice that selecting a person in the TableView does nothing to the labels at the right side. That is because the user interaction portion has not been programmed yet, which we will cover in the next part of the tutorial.
Evidence:
Using JavaFX in any past project. Suggested: Do the exercise in [Addressbook-Level3: LO-JavaFX]
Project Management
W6.8 Can explain continuous integration and continuous deployment
W6.8a Can explain integration
W6.8b Can explain build automation tools
Implementation → Integration → Build Automation →
Build automation tools automate the steps of the build process, usually by means of build scripts.
In a non-trivial project, building a product from source code can be a complex multi-step process. For example, it can include steps such as to pull code from the revision control system, compile, link, run automated tests, automatically update release documents (e.g. build number), package into a distributable, push to repo, deploy to a server, delete temporary files created during building/testing, email developers of the new build, and so on. Furthermore, this build process can be done ‘on demand’, it can be scheduled (e.g. every day at midnight) or it can be triggered by various events (e.g. triggered by a code push to the revision control system).
Some of these build steps such as to compile, link and package are already automated in most modern IDEs. For example, several steps happen automatically when the ‘build’ button of the IDE is clicked. Some IDEs even allow customization to this build process to some extent.
However, most big projects use specialized build tools to automate complex build processes.
Some popular build tools relevant to Java developers:
Some other build tools : Grunt (JavaScript), Rake (Ruby)
Some build tools also serve as dependency management tools. Modern software projects often depend on third party libraries that evolve constantly. That means developers need to download the correct version of the required libraries and update them regularly. Therefore, dependency management is an important part of build automation. Dependency Management tools can automate that aspect of a project.
Maven and Gradle, in addition to managing the build process, can play the role of dependency management tools too.
- Getting Started with Gradle -- Documentation from Gradle
- Gradle Tutorial -- from tutorialspoint.com
Gradle_is used used for,
- a. better revision control
- b. build automation
- c. UML diagramming
- d. project collaboration
(b)
Evidence:
- Explain what Gradle is and how it helps in the AddressBook project.
- Run various project tasks using Gradle as described in [AddressBook - Level 4: Using Gradle] e.g. run tests in headless mode
W6.8c Can explain continuous integration and continuous deployment
Implementation → Integration → Build Automation →
An extreme application of build automation is called continuous integration (CI) in which integration, building, and testing happens automatically after each code change.
A natural extension of CI is Continuous Deployment (CD) where the changes are not only integrated continuously, but also deployed to end-users at the same time.
Some examples of CI/CD tools:
- Travis CI for Beginners -- Documentation from Travis
Evidence:
- Explain what Travis is and how it helps in the AddressBook project.
- One member: Set up Travis for your team repo by following [AddressBook - Level 4: Using Travis]
🅿️ Project
W6.9 Can work with a 3KLoC code base
[Optional, but recommended] If you are not comfortable jumping from AB-2 (~2KLoc) straight to AB-4 (~10KLoc), we recommend that you play around with [AddressBook - Level3] for a bit before moving to AB-4. As before, fork, clone, set up project in your Computer, and try to do a small enhancement to AB-3.
How AB-3 differs from AB-2:
- A simple GUI has been added to replace the Text UI.
- No more I/O tests
- A
Logicclass has been added together with aLogicTestclass.
W6.10 Can contribute to project documentation
Covered by:
Tutorial 6
Questions to do during tutorial:
Explain the meaning of various class diagram notations in the following class diagram:
Explain in your own words the interactions illustrated by this Sequence Diagram:
Consider the code below:
public interface Billable {
    void bill();
}
public abstract class Item
         implements Billable {
    public abstract void print();
}
public class StockItem extends Item {
    private Review review;
    private String name;

    public StockItem(
        String name, Rating rating){

        this.name = name;
        this.review = new Review(rating);
    }

    @Override
    public void print() {
        //...
    }

    @Override
    public void bill() {
        //...
    }
}
public enum Rating {
    GOOD, OK, POOR
}
public class Review {
    private final Rating rating;

    public Review(Rating rating) {
        this.rating = rating;
    }
}
import java.util.List;

public class Inventory {
    private List<Item> items;

    public int getItemCount(){
        return items.size();
    }

    public void generateBill(Billable b){
        // ...
    }

    public void add(Item s) {
        items.add(s);
    }
}
(a) Draw a class diagram to represent the code
(b) Draw an object diagram to represent the situation where the inventory has one item with a name spanner and a review of POOR rating.
Consider the code below:
class Person{
    Tag tag;
    String name;

    Person(String personName, String tagName){
        name = personName;
        tag = new Tag(tagName);
    }
}
class Tag{
    Tag(String value){
        //...
    }
}

class PersonList{
    void addPerson(Person p){
        //...
    }
}
Draw a sequence diagram to illustrate the object interactions that happen in the code snippet below:
PersonList personList = new PersonList();
while (hasRoom){
    Person p = new Person("Adam", "friend");
    personList.addPerson(p);
}
W6.2a Can draw basic sequence diagrams
Design → Modelling → Modelling Behaviors
Explain in your own words the interactions illustrated by this Sequence Diagram:
Consider the code below:
class Person{
    Tag tag;
    String name;

    Person(String personName, String tagName){
        name = personName;
        tag = new Tag(tagName);
    }
}
class Tag{
    Tag(String value){
        //...
    }
}

class PersonList{
    void addPerson(Person p){
        //...
    }
}
Draw a sequence diagram to illustrate the object interactions that happen in the code snippet below:
PersonList personList = new PersonList();
while (hasRoom){
    Person p = new Person("Adam", "friend");
    personList.addPerson(p);
}
Find notation mistakes in the sequence diagram below:
Evidence:
Consider the code below:
class Person{
    Tag tag;
    String name;

    Person(String personName, String tagName){
        name = personName;
        tag = new Tag(tagName);
    }
}
class Tag{
    Tag(String value){
        //...
    }
}

class PersonList{
    void addPerson(Person p){
        //...
    }
}
Draw a sequence diagram to illustrate the object interactions that happen in the code snippet below:
PersonList personList = new PersonList();
while (hasRoom){
    Person p = new Person("Adam", "friend");
    personList.addPerson(p);
}
W6.3c Can explain multi-level design
Design → Introduction →
In a smaller system, design of the entire system can be shown in one place.
This class diagram of se-edu/addressbook-level3 depicts the design of the entire software.
Design of bigger systems needs to be done/shown at multiple levels.
This architecture diagram of se-edu/addressbook-level4 depicts the high-level design of the software.
Here are examples of lower level designs of some components of the same software:
Evidence:
Covered by the project. In particular, when getting started on modifying AB-4, you are recommended to start by doing local changes (i.e., changes local to a component) first and then move to global changes (i.e., changes that touch multiple components). As AB-4 users multi-level design, you should be able to do most of the local changes without having to learn internal details of the other components.
W6.4b Can use logging
Implementation → Error Handling → Logging →
Most programming environments come with logging systems that allow sophisticated forms of logging. They have features such as the ability to enable and disable logging easily or to change the logging
This sample Java code uses Java’s default logging mechanism.
First, import the relevant Java package:
import java.util.logging.*;
Next, create a Logger:
private static Logger logger = Logger.getLogger("Foo");
Now, you can use the Logger object to log information. Note the use of WARNING so that log messages specified as INFO level (which is a lower level than WARNING) will not be written to the log file at all.
// log a message at INFO level
logger.log(Level.INFO, "going to start processing");
//...
processInput();
if(error){
    //log a message at WARNING level
    logger.log(Level.WARNING, "processing error", ex);
}
//...
logger.log(Level.INFO, "end of processing");
Tutorials:
- Java Logging API - Tutorial -- A tutorial by Lars Vogella
- Java Logging Tutorial -- An alternative tutorial by Jakob Jenkov
- A video tutorial by SimplyCoded:
Best Practices:
- 10 Tips for Proper Application Logging -- by Tomasz Nurkiewicz
- What each logging level means -- conventions recommended by Apache Project
Evidence:
Use of logging in the code you have written in the module project or elsewhere.
W6.5b Can use assertions
Implementation → Error Handling → Assertions →
Use the assert keyword to define assertions.
This assertion will fail with the message x should be 0 if x is not 0 at this point.
x = getX();
assert x == 0 : "x should be 0";
...
Assertions can be disabled without modifying the code.
java -enableassertions HelloWorld (or java -ea HelloWorld) will run HelloWorld with assertions enabled while java -disableassertions HelloWorld will run it without verifying assertions.
Java disables assertions by default. This could create a situation where you think all assertions are being verified as true while in fact they are not being verified at all. Therefore, remember to enable assertions when you run the program if you want them to be in effect.
💡 Enable assertions in Intellij (how?) and get an assertion to fail temporarily (e.g. insert an assert false into the code temporarily) to confirm assertions are being verified.
Java assert vs JUnit assertions: They are similar in purpose but JUnit assertions are more powerful and customized for testing. In addition, JUnit assertions are not disabled by default. We recommend you use JUnit assertions in test code and Java assert in functional code.
Tutorials:
- Java Assertions -- a simple tutorial from javatpoint.com
- Programming with Assertions (first half) -- a more detailed tutorial from Oracle
Best practices:
- Programming with Assertions (second half) -- from Oracle (also listed above as a tutorial) contains some best practices towards the end of the article.
Evidence:
Explain assertions in AddressBook-Level4 code.
W6.5c Can use assertions optimally
Implementation → Error Handling → Assertions →
It is recommended that assertions be used liberally in the code. Their impact on performance is considered low and worth the additional safety they provide.
Do not use assertions to do work because assertions can be disabled. If not, your program will stop working when assertions are not enabled.
The code below will not invoke the writeFile() method when assertions are disabled. If that method is performing some work that is necessary for your program, your program will not work correctly when assertions are disabled.
...
assert writeFile() : "File writing is supposed to return true";
Assertions are suitable for verifying assumptions about Internal Invariants, Control-Flow Invariants, Preconditions, Postconditions, and Class Invariants. Refer to [Programming with Assertions (second half)] to learn more.
Exceptions and assertions are two complementary ways of handling errors in software but they serve different purposes. Therefore, both assertions and exceptions should be used in code.
- The raising of an exception indicates an unusual condition created by the user (e.g. user inputs an unacceptable input) or the environment (e.g., a file needed for the program is missing).
- An assertion failure indicates the programmer made a mistake in the code (e.g., a null value is returned from a method that is not supposed to return null under any circumstances).
A Calculator program crashes with an ‘assertion failure’ message when you try to find the square root of a negative number.
(c)
Explanation: An assertion failure indicates a bug in the code. (b) is not acceptable because of the word "terminated". The application should not fail at all for this input. But it could have used an exception to handle the situation internally.
Which statements are correct?
- a. Use assertions to indicate the programmer messed up; Use exceptions to indicate the user or the environment messed up.
- b. Use exceptions to indicate the programmer messed up; Use assertions to indicate the user or the environment messed up.
(a)
Evidence:
Give an example from the AddressBook-Level4 code where an exception is used and explain why an assertion is not suitable for that situation. Similarly, explain why an exception is not suitable for a place where AddressBook Level4 uses an assertion.
W6.6a Can use Java8 streams :
Tools → Java →
Java 8 introduced a number of new features (e.g. Lambdas, Streams) that are not trivial to learn but also extremely useful to know.
Here is an overview of new Java 8 features . (written by Benjamin Winterberg)
Tutorials:
- Java 8 Tutorial -- from tutorialspoint.com. 💡 Also provides a way to try out code online
- Tutorials from Oracle: [Lambdas][Streams]
A video tutorial by well-known Java coach Venkat Subramaniam
Evidence:
Some code you have written (can be toy examples) that uses some Java 8 features.
W6.7a Can use JavaFX to build a simple GUI
Tools → Java →
Adapted (with permissions) from Marco Jakob's JavaFX 8 tutorial.
JavaFx 9 Tutorial - Part 1: Scene Builder
Introduction
This tutorial will teach you how to create a new JavaFX application in IntelliJ, and to use the SceneBuilder to create a layouts for your application.
Prerequisites
- Latest Java JDK 9 (includes JavaFX 9)
- IntelliJ (2018.2 or later)
- SceneBuilder 8 (provided by Gluon as Oracle no longer ships the tool in binary form)
Do remember the installation path to SceneBuilder 8 as we will need it to configure IntelliJ in a later step.
IntelliJ Configurations
If this is the first time using IntelliJ, you need to tell IntelliJ where to find JDK 9 and SceneBuilder.
Configuring JDK 9
- On the Welcome screen, press
Configure→Project Default→Project Structure.
- If you already have a project open, go to the Welcome screen by going to
File→Close Project.
- Under
Project SDK:, pressNew...→JDK. - Select the directory that you install JDK on, and press
OK. - Under
Project language level:, select9 - Modules, private methods in interfaces etc..
- Press
OKagain.
Configuring Scene Builder
- On the Welcome screen, press
Configure→Settings. - On the left hand side, select
Languages & Frameworks→JavaFX - Under
Path to SceneBuilder:, select the path to where SceneBuilder is installed (e.g.C:\Users\Admin\AppData\Local\SceneBuilder\SceneBuilder.exeon Windows)
The JavaDocs will come in handy when writing your own JavaFX applications:
Additionally, Oracle also has a tutorial on JavaFX if you are interested.
Create a new JavaFX Project
- On the Welcome screen, press
Create New Project.
- If you already have a project, you can create a new project by going
File→New→Project....
- On the left side, select
JavaFX. Make sure that the Project SDK is set to9andJavaFX Applicationis selected.
- Press
Next. - Give a name for the application (e.g.
AddressApp), and specify a suitable location. - Press
Finish. If prompted to create a new directory, just pressOK.
Remove the sample package and its content. We will manually create our own package and resources in our tutorial.
We will also have to set up the IDE further, so that warnings and errors show up correctly when working with Java 9:
- Go to the menu
File→Project Structure. - Under
Project language level:, ensure that9 - Modules, private methods in interfaces etc.is selected.
Create the Packages
In We will create a package for each of the component. Ensure that your Project pane is open (Alt+1). Right click on the src folder, and select New → Package:
seedu.address- contains the controller classes (i.e. the part that deals with the business logic)seedu.address.model- contains the model classes (i.e. the part that deals with data)seedu.address.view- contains the views (i.e. the part that deals with presenting the data to the user)
In subsequent tutorials, our view package will also contain some controllers that are directly related to a single view. We will call them view-controllers.
Create the FXML Layout File
There are two ways to create the UI:
- Use FXML, which is an XML format.
- Programmatically create the interface in Java.
We will use FXML for most parts, so that we can separate the view and controller from each other. Furthermore, we are able to use the Scene Builder tool to edit our FXML file. That means we will not have to directly work with XML.
Right click on the view package, and press New → FXML file. For the file name, type PersonOverview.fxml.
Design with Scene Builder
Right-click on PersonOverview.fxml and choose Open with Scene Builder. Now you should see the Scene Builder with just an AnchorPane (visible under Hierarchy on the left).
If IntelliJ prompts for a location of the SceneBuilder executable, make sure to point to where you install SceneBuilder.
- Select the
Anchor Panein your Hierarchy, and adjust the size under Layout (right side). (Pref Width: 600, Pref Height: 300)
- Add a
Split Pane (horizontal)(underContainers) by dragging it from the Library into the main area. Right-click theSplit Panein the Hierarchy view and selectFit to Parent.
- Drag a
TableView(underControlsin Library view) into the left side of theSplitPane. Select theTableView(not a Column) and set the following layout constraints in the Inspector to theTableView. Inside anAnchorPaneyou can always set anchors to the four borders (see this page for more information on Layouts).
-
Go to the menu
Preview→Show Preview in Windowto see whether the layout configuration is done correctly. Try resizing the window. TheTableViewshould resize together with the window as it is anchored to the borders. -
Change the column text (under Properties) to "First Name" and "Last Name".
- Select the
TableViewand chooseconstrainted-resizefor the 'Column Resize Policy'. This ensures that the columns will always fill up the entire available space.
- Add a
Labelon the right side with the text "Person Details:". Adjust the layout using anchors (Top: 5, Left: 5. Right: Blank, Bottom: Blank).
You can use the Search Bar at the top of Library/Inspector to find the respective controls/properties.
- Add a
GridPaneon the right side. Select it, and adjust its layout using anchors (Top: 30, Left: 5, Right: 5, Bottom: Blank).
- Add the following labels to the cells, such that the grid is of this form:
| First Name | Label |
|---|---|
| Last Name | Label |
| Street | Label |
| City | Label |
| Postal Code | Label |
| Birthday | Label |
To add a row to the GridPane, select an existing row number, right click the row number and choose "Add Row Below".
- Add a
ButtonBarat the bottom. Add three buttons to the bar ("New...", "Edit...","Delete"). Adjust the anchors so that it stays at the bottom right (Top: Blank, Left: Blank, Right: 10, Bottom: 5).
- Now you should see something like the following. Use the
Previewmenu to test its resizing behaviour.
- Save the
.fxmlfile.
Create the Main Application
The PersonOverview.fxml that we just created only contains the content of our entire application. We need another FXML for our root layout, which will contain a menu bar and wraps PersonOverview.fxml.
- Inside IntelliJ, right click on the
viewpackage, and pressNew→FXML file. For the file name, typeRootLayout.fxml. - Right-click on
RootLayout.fxmland chooseOpen with Scene Builder. - Delete the
AnchorPane. We will use another pane for our root layout.
- Add
BorderPaneby dragging it from the Library view into the main area.
- Resize the
BorderPane(Pref Width: 600, Pref Height: 400)
- Add a
MenuBarinto theinsert TOPslot. We will not implement menu functionality for now.
The JavaFX Main Class
Now, we need to create the main Java class that starts up our application with the RootLayout.fxml and adds the PersonOverview.fxml in the center.
Right-click on your seedu.address package, and choose New → JavaFXApplication. For the class name, type MainApp.
The generated MainApp.java class extends from Application and contains two methods. This is the basic structure that we need to start a JavaFX Application. The most important part for us is the start(Stage primaryStage) method. It is automatically called when the application is launch() from within the main() method.
As you see, the start(...) method receives a Stage as parameter. The following graphic illustrates the structure of every JavaFX application:
Image Source: http://www.oracle.com
It's like a theater play: The Stage is the main container which is usually a Window with a border and the typical minimize, maximize and close buttons. Inside the Stage you add a Scene which can, of course, be switched out by another Scene. Inside the Scene the actual JavaFX nodes like AnchorPane, TextBox, etc. are added.
See this page for more info on working with the JavaFX Scene Graph.
Open MainApp.java and replace the code with the following:
MainApp.java
package seedu.address;

import java.io.IOException;

import javafx.application.Application;
import javafx.fxml.FXMLLoader;
import javafx.scene.Scene;
import javafx.scene.layout.AnchorPane;
import javafx.scene.layout.BorderPane;
import javafx.stage.Stage;

public class MainApp extends Application {
    private Stage primaryStage;
    private BorderPane rootLayout;

    @Override
    public void start(Stage primaryStage) {
        this.primaryStage = primaryStage;
        this.primaryStage.setTitle("AddressApp");

        initRootLayout();

        showPersonOverview();
    }

    /**
     * Initializes the root layout.
     */
    public void initRootLayout() {
        try {
            // Load root layout from fxml file.
            FXMLLoader loader = new FXMLLoader();
            loader.setLocation(MainApp.class.getResource("view/RootLayout.fxml"));
            rootLayout = loader.load();

            // Show the scene containing the root layout.
            Scene scene = new Scene(rootLayout);
            primaryStage.setScene(scene);
            primaryStage.show();
        } catch (IOException e) {
            e.printStackTrace();
        }
    }

    /**
     * Shows the person overview inside the root layout.
     */
    public void showPersonOverview() {
        try {
            // Load person overview.
            FXMLLoader loader = new FXMLLoader();
            loader.setLocation(MainApp.class.getResource("view/PersonOverview.fxml"));
            AnchorPane personOverview = loader.load();

            // Set person overview into the center of root layout.
            rootLayout.setCenter(personOverview);
        } catch (IOException e) {
            e.printStackTrace();
        }
    }

    /**
     * Returns the main stage.
     */
    public Stage getPrimaryStage() {
        return primaryStage;
    }

    public static void main(String[] args) {
        launch(args);
    }
}
The various comments should give you some hints about what's going on.
Importing JavaFx 9
JavaFx 9 is a separate module from Java 9. We must ensure that the modules are imported correctly.
Notice that IntellJ will complain about the imported modules "not being in the module graph":
To fix this:
- Ensure that your Project pane is open (Alt+1). Right click on the
srcfolder, and selectNew→module-info.java: - Add the following
requiresandexportsin order to import and export the modules correctly:
module AddressApp {
    requires javafx.graphics;
    requires javafx.fxml;
    requires javafx.controls;

    exports seedu.address;
}
Running the Application
If you run the application now (right click MainApp.java and select Run MainApp.main()), you should see something like this:
Possible Issues
If JavaFx fails to load PersonOverview.fxml, you might get the following error message:
javafx.fxml.LoadException:
/.../AddressApp/out/production/AddressApp/seedu/address/view/PersonOverview.fxml:15
To solve this issue, open PersonOverview.fxml normally in IntelliJ and ensure that there is no such attribute around:
fx:controller="seedu.address.view.PersonOverview"
JavaFx 9 tutorial - Part 2: Model and TableView
Introduction
In this tutorial, we will create the other parts of the application (mainly the model and the controller). We will also use ObservableList and *Property to bind our list of new model's Persons, and their individual details, to the view, with the controller as the "middleman".
Create the Model class
We need a model class in order to hold information about the people in our address book. Add a new class to the model package (seedu.address.model) called Person. The Person class will encapsulate the details of an individual person such as name, address and birthday. Add the following code to the class. The JavaFX specifics will be explained after the code snippet.
Person.java
package seedu.address.model;

import java.time.LocalDate;

import javafx.beans.property.IntegerProperty;
import javafx.beans.property.ObjectProperty;
import javafx.beans.property.SimpleIntegerProperty;
import javafx.beans.property.SimpleObjectProperty;
import javafx.beans.property.SimpleStringProperty;
import javafx.beans.property.StringProperty;

/**
 * Model class for a Person.
 */
public class Person {

    private final StringProperty firstName;
    private final StringProperty lastName;
    private final StringProperty street;
    private final IntegerProperty postalCode;
    private final StringProperty city;
    private final ObjectProperty< LocalDate > birthday;

    /**
     * Default constructor.
     */
    public Person() {
        this(null, null);
    }

    /**
     * Constructor with some initial data.
     */
    public Person(String firstName, String lastName) {
        this.firstName = new SimpleStringProperty(firstName);
        this.lastName = new SimpleStringProperty(lastName);

        // Some initial dummy data, just for convenient testing.
        this.street = new SimpleStringProperty("some street");
        this.postalCode = new SimpleIntegerProperty(1234);
        this.city = new SimpleStringProperty("some city");
        this.birthday = new SimpleObjectProperty< LocalDate >(LocalDate.of(1999, 2, 21));
    }

    public String getFirstName() {
        return firstName.get();
    }

    public void setFirstName(String firstName) {
        this.firstName.set(firstName);
    }

    public StringProperty firstNameProperty() {
        return firstName;
    }

    public String getLastName() {
        return lastName.get();
    }

    public void setLastName(String lastName) {
        this.lastName.set(lastName);
    }

    public StringProperty lastNameProperty() {
        return lastName;
    }

    public String getStreet() {
        return street.get();
    }

    public void setStreet(String street) {
        this.street.set(street);
    }

    public StringProperty streetProperty() {
        return street;
    }

    public int getPostalCode() {
        return postalCode.get();
    }

    public void setPostalCode(int postalCode) {
        this.postalCode.set(postalCode);
    }

    public IntegerProperty postalCodeProperty() {
        return postalCode;
    }

    public String getCity() {
        return city.get();
    }

    public void setCity(String city) {
        this.city.set(city);
    }

    public StringProperty cityProperty() {
        return city;
    }

    public LocalDate getBirthday() {
        return birthday.get();
    }

    public void setBirthday(LocalDate birthday) {
        this.birthday.set(birthday);
    }

    public ObjectProperty< LocalDate > birthdayProperty() {
        return birthday;
    }
}
Explanations
- With JavaFX, it is common to use
*Propertyfor all fields of a model class. APropertyallows us, for example, to automatically be notified when thelastNameor any other variable is changed. This helps us keep the view in sync with the data. - To learn more about
*Property, refer to Using JavaFX Properties and Binding LocalDate, the type that we are using forbirthday, is part of the new Date and Time API since JDK 8
A List of Persons
The main data that our application manages is simply a bunch of persons. Let's create a list of Person objects inside the MainApp class. All other controller classes will later get access to that central list inside the MainApp.
ObservableList
We are working with JavaFX view classes that need to be informed about any changes made to the list of persons. This is important, since otherwise the view would not be in sync with the data. For this purpose, JavaFX introduces some new Collection classes.
Among all these collections, we need the ObservableList. To create a new ObservableList, add the following code at the beginning of the MainApp class. We'll also add a constructor that creates some sample data and a public getter method:
MainApp.java
// ... AFTER THE OTHER VARIABLES ...

/**
* The data as an observable list of {@link Person}.
*/
private ObservableList< Person > personData = FXCollections.observableArrayList();

    /**
     * Constructor
     */
    public MainApp() {
        // Add some sample data
        personData.add(new Person("Hans", "Muster"));
        personData.add(new Person("Ruth", "Mueller"));
        personData.add(new Person("Heinz", "Kurz"));
        personData.add(new Person("Cornelia", "Meier"));
        personData.add(new Person("Werner", "Meyer"));
        personData.add(new Person("Lydia", "Kunz"));
        personData.add(new Person("Anna", "Best"));
        personData.add(new Person("Stefan", "Meier"));
        personData.add(new Person("Martin", "Mueller"));
    }

    /**
     * Returns the data as an observable list of {@link Person}.
     */
    public ObservableList< Person > getPersonData() {
        return personData;
    }

    // ... THE REST OF THE CLASS ...
The PersonOverviewController
We have our model and view. Let's get our data into our table. We'll need a controller for our PersonOverview.fxml to act as a "middleman" for the model and view.
Create a normal Java class inside the view package called PersonOverviewController.
Note: We must put the class inside the same package as PersonOverview.fxml, otherwise the SceneBuilder won't be able to find it.
We will add some instance variables that give us access to the table and the labels inside the view. The fields and some methods have a special @FXML annotation. This is necessary in order for the .fxml file to have access to private fields and private methods. After we have everything set up in the .fxml file, the application will automatically fill the variables when the .fxml file is loaded.
So let's add the following code:
Note: Remember to always use the javafx imports, NOT awt or swing.
PersonOverviewController.java
package seedu.address.view;

import javafx.fxml.FXML;
import javafx.scene.control.Label;
import javafx.scene.control.TableColumn;
import javafx.scene.control.TableView;
import seedu.address.MainApp;
import seedu.address.model.Person;

public class PersonOverviewController {
    @FXML
    private TableView< Person> personTable;
    @FXML
    private TableColumn< Person, String> firstNameColumn;
    @FXML
    private TableColumn< Person, String> lastNameColumn;

    @FXML
    private Label firstNameLabel;
    @FXML
    private Label lastNameLabel;
    @FXML
    private Label streetLabel;
    @FXML
    private Label postalCodeLabel;
    @FXML
    private Label cityLabel;
    @FXML
    private Label birthdayLabel;

    // Reference to the main application.
    private MainApp mainApp;

    /**
     * The constructor. It is called before the initialize() method.
     */
    public PersonOverviewController() {
    }

    /**
     * Initializes the controller class. This method is automatically called
     * after the fxml file has been loaded.
     */
    @FXML
    private void initialize() {
        // Initialize the person table with the two columns.
        firstNameColumn.setCellValueFactory(cellData -> cellData.getValue().firstNameProperty());
        lastNameColumn.setCellValueFactory(cellData -> cellData.getValue().lastNameProperty());
    }

    /**
     * Is called by the main application to give a reference back to itself.
     */
    public void setMainApp(MainApp mainApp) {
        this.mainApp = mainApp;

        // Add observable list data to the table
        personTable.setItems(mainApp.getPersonData());
    }
}
Explanations
- All fields and methods where the
.fxmlfile needs access must be annotated with@FXML.- Actually, only if they are private, but it's better to have them private and mark them with the annotation!
- The
initialize()method is automatically called after the.fxmlfile has been loaded. At this time, all the FXML fields should have been initialized already. - The
setCellValueFactory(...)that we set on the table colums are used to determine which field inside thePersonobjects should be used for the particular column. The arrow->indicates that we're using a Java 8 feature called Lambdas. (Another option would be to use aPropertyValueFactory, but this is not type-safe).
Note:
We're only using StringProperty values for our table columns in this example. When you want to use IntegerProperty or DoubleProperty, the setCellValueFactory(...) must have an additional asObject():
myIntegerColumn.setCellValueFactory(cellData ->
    cellData.getValue().myIntegerProperty().asObject());
This is necessary because of a bad design decision of JavaFX (see this discussion for more details).
Connecting MainApp with the PersonOverviewController
The setMainApp(...) method must be called by the MainApp class. This gives us a way to access the MainApp object and get the list of Persons and other things. Add the following three lines to showPersonOverview() the method:
MainApp.java - additional lines to add to showPersonOverview() method
// (.... root layout statement goes here ....)

// Give the controller access to the main app.
    PersonOverviewController controller = loader.getController();
    controller.setMainApp(this);

// (.... catch statement goes here ....)
Your showPersonOverview() method in MainApp should now look like this:
MainApp.java - new showPersonOverview() method
/**
* Shows the person overview inside the root layout.
*/
public void showPersonOverview() {
    try {
        // Load person overview.
        FXMLLoader loader = new FXMLLoader();
        loader.setLocation(MainApp.class.getResource("view/PersonOverview.fxml"));
        AnchorPane personOverview = loader.load();

        // Set person overview into the center of root layout.
        rootLayout.setCenter(personOverview);

        // Give the controller access to the main app.
        PersonOverviewController controller = loader.getController();
        controller.setMainApp(this);
    } catch (IOException e) {
        e.printStackTrace();
    }
}
Hook the View to the controller
We're almost there! But one thing is missing: We haven't told our PersonOverview.fxml file which controller to use, and which element should match to which field inside the controller.
- Open
PersonOverview.fxmlwith the SceneBuilder. - Open the Controller group on the left side (just below Hierarchy), and select the
seedu.address.view.PersonOverviewControlleras the controller class.
- Select the
TableViewin the Hierarchy group. - In the Inspector view, under the Code group, set 'fx:id' to
personTable.
- Do the same for the table columns. Select
firstNameColumnandlastNameColumnfor the 'fx:id' respectively. - For each label in the second column of the grid pane, choose the corresponding 'fx:id'.
- Save the
.fxmlfile.
Opening up the PersonOverviewController to JavaFx
If you try and run the application now, you will encounter the following error:
javafx.fxml.LoadException: ...

...

Caused by: java.lang.IllegalAccessException: class javafx.fxml.FXMLLoader$ValueElement (in module javafx.fxml) cannot access class seedu.address.view.PersonOverviewController (in module AddressApp) because module AddressApp does not export seedu.address.view to module javafx.fxml
This is because JavaFx is unable to access our PersonOverviewController class.
To fix this, add this line of code to src/module-info.java:
module AddressApp {
    ...

    opens seedu.address.view;
}
The file should now look something like this:
module-info.java
module AddressApp {
    requires javafx.graphics;
    requires javafx.fxml;
    requires javafx.controls;

    exports seedu.address;
    opens seedu.address.view;
}
Start the Application
When you start your application now, you should see something like this:
Congratulations! The application now shows the list of Persons in the view!
You may notice that selecting a person in the TableView does nothing to the labels at the right side. That is because the user interaction portion has not been programmed yet, which we will cover in the next part of the tutorial.
Evidence:
Using JavaFX in any past project. Suggested: Do the exercise in [Addressbook-Level3: LO-JavaFX]
W6.8b Can explain build automation tools
Implementation → Integration → Build Automation →
Build automation tools automate the steps of the build process, usually by means of build scripts.
In a non-trivial project, building a product from source code can be a complex multi-step process. For example, it can include steps such as to pull code from the revision control system, compile, link, run automated tests, automatically update release documents (e.g. build number), package into a distributable, push to repo, deploy to a server, delete temporary files created during building/testing, email developers of the new build, and so on. Furthermore, this build process can be done ‘on demand’, it can be scheduled (e.g. every day at midnight) or it can be triggered by various events (e.g. triggered by a code push to the revision control system).
Some of these build steps such as to compile, link and package are already automated in most modern IDEs. For example, several steps happen automatically when the ‘build’ button of the IDE is clicked. Some IDEs even allow customization to this build process to some extent.
However, most big projects use specialized build tools to automate complex build processes.
Some popular build tools relevant to Java developers:
Some other build tools : Grunt (JavaScript), Rake (Ruby)
Some build tools also serve as dependency management tools. Modern software projects often depend on third party libraries that evolve constantly. That means developers need to download the correct version of the required libraries and update them regularly. Therefore, dependency management is an important part of build automation. Dependency Management tools can automate that aspect of a project.
Maven and Gradle, in addition to managing the build process, can play the role of dependency management tools too.
- Getting Started with Gradle -- Documentation from Gradle
- Gradle Tutorial -- from tutorialspoint.com
Gradle_is used used for,
- a. better revision control
- b. build automation
- c. UML diagramming
- d. project collaboration
(b)
Evidence:
- Explain what Gradle is and how it helps in the AddressBook project.
- Run various project tasks using Gradle as described in [AddressBook - Level 4: Using Gradle] e.g. run tests in headless mode
W6.8c Can explain continuous integration and continuous deployment
Implementation → Integration → Build Automation →
An extreme application of build automation is called continuous integration (CI) in which integration, building, and testing happens automatically after each code change.
A natural extension of CI is Continuous Deployment (CD) where the changes are not only integrated continuously, but also deployed to end-users at the same time.
Some examples of CI/CD tools:
- Travis CI for Beginners -- Documentation from Travis
Evidence:
- Explain what Travis is and how it helps in the AddressBook project.
- One member: Set up Travis for your team repo by following [AddressBook - Level 4: Using Travis]
W6.9 Can work with a 3KLoC code base
[Optional, but recommended] If you are not comfortable jumping from AB-2 (~2KLoc) straight to AB-4 (~10KLoc), we recommend that you play around with [AddressBook - Level3] for a bit before moving to AB-4. As before, fork, clone, set up project in your Computer, and try to do a small enhancement to AB-3.
How AB-3 differs from AB-2:
- A simple GUI has been added to replace the Text UI.
- No more I/O tests
- A
Logicclass has been added together with aLogicTestclass.
W6.10 Can contribute to project documentation
Covered by:
Lecture 6
Questions to discuss during the lecture:
Find notation mistakes in the sequence diagram below: